• Skip to primary navigation
  • Skip to main content
  • Skip to footer

Stickytapeandstring

Created with WordPress managed by 1&1

  • Craft projects
    • craft business tips
    • craft blog
    • Crochet patterns
    • Upcycling
    • craft with kids
  • Blogging
    • New to blogging
    • Blog diary
  • Bullet Journal
  • About me
  • Welcome!!

Crochet patterns

Design your Lockdown Lapghan

December 28, 2020 by A_Sticky_tape_and_string_girl Leave a Comment

The Lockdown Lapghan is a very easy crochet blanket for beginners. This is the second in a series of three posts. The first post contains the free pattern for each square of the blanket. You can read this post here. In this second post you will find the charts to help you design your Lockdown Lapghan.

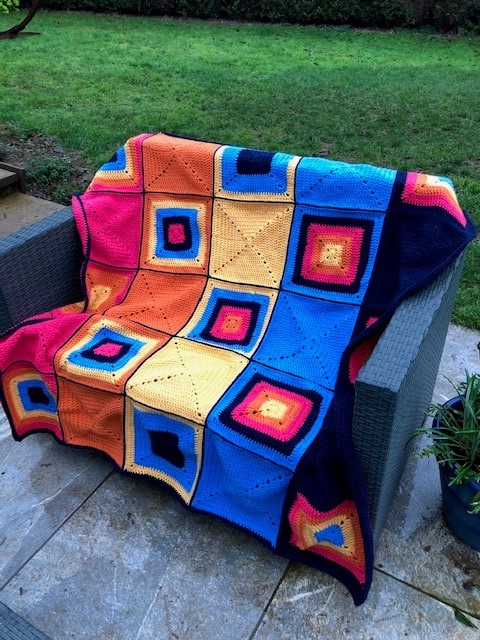
The design is based on five colours. I have two suggests sets of colours in my first post but you can make your own choices. This way your Lockdown Lapghan will be your own design. There are two versions of the chart for you to download at the bottom of this post. The colour version follows the Autumn Sunset colours used in the completed blanket below. Sorry about this picture – all it has done here recently is rain!

lockdown lapghan - autumn sunset
lockdown lapghan – Autumn Sunset

The black and white version of the chart will be easier for you to follow if you are choosing your own colours. You could print this black and white version and do a bit of mindful colouring in as part of your process to select colours. I love a bit of colouring in ๐Ÿ™‚

Yarn Selection

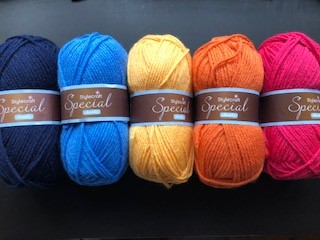
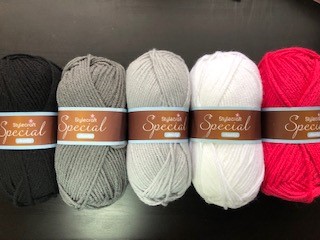
The yarn I used for this blanket was Stylecraft Special Chunky. This yarn is very good value and there is a wide range of colours as you can see here at Woolwarehouse. As you design your lockdown lapghan, I recommend you start with a view of the colours available.

You don’t have to stick to the yarn I used. It is possible to use any yarn type as long as you adjust the tension to match. However, this can get a bit tricky and this pattern is designed for beginners so I won’t cover that here. Please let me know if you would like instruction on how to do this and I will put up a separate post.

Design your Lockdown Lapghan – Joining up and edging

The final touches to your lockdown lapghan design will be the joining colours and edging. For both the blankets I designed I used the strongest colour for the joins and edging. I think that this gives the squares more definition which is the look I was going for. However, the joining method I recommend can be ‘invisible’ if you use the colour of one of the squares you are joining. This is a design choice so over to you!

Your choice of joining colours will have a big impact on the appearance of the finished blanket. Similarly, the edging you choose will make a real difference to the look of your work. I like to edge in a darker colour, again this is partly for the definition I think it gives. Practicality also tells me that a white edge would be asking for trouble in terms of my ability to keep it clean. Maybe that is just me, in a house with three muddy dogs!

I think that is all you need from me so here are the two free downloads.

Lockdown Lapghan chart – colour (9162 downloads )

Lockdown Lapghan chart – black and white (9414 downloads )

I hope you have fun designing your own Lockdown Lapghan and if you are new to crochet I hope you come love it as much as I do. Please do let me know how you get on. I would love to get some comments. Happy crocheting!

Annie ๐Ÿ™‚

Filed Under: Crochet patterns Tagged With: beginner crochet, crochet, crochet beginner, crochet blanket, easy crochet lapghan, free crochet pattern, Free pattern, lapghan

Easy Crochet Lapghan for Beginners

November 29, 2020 by A_Sticky_tape_and_string_girl Leave a Comment

I am calling this pattern Lockdown Lapghan which I hope dates this post forever because I really hope that lockdown is a feature of 2020 alone! This is a great time to try new hobbies so I wanted to create a really easy pattern for crochet newbies. To complete the pattern, you only need to know how to do one stitch plus chain. This is an easy crochet lapghan for beginners. You can put your own stamp on the pattern by choosing a different set of colours. I am working with two colour ways initially. The first set of colours were inspired by autumn sunsets, I love the warmth of these colours.

Lockdown Lapghan - Autumn Sunset
Stylecraft Special Chunky. Midnight, Aster, saffron, spice and pomegranate

The second set of colours I picked were more for winter and the approaching festive season. I am calling those Berries in the Snow :-).

Lockdown Lapghan - berries in the snow
Stylecraft Special Chunky. Black, Graphite, Silver, White, Pomegranate

The yarn I am using is Stylecraft Special Chunky. This is a good quality inexpensive yarn with a great range of colours. I buy all my yarn through woolwarehouse in the UK as I find their range and customer service exceptionally good! Please note I have no relationship with this business but the link above will take you to their website.

If you are using Stylecraft Special Chunky yarn you will need a 6mm hook and each block will measure around 10 inches square. If you are using a different yarn please check the ball band for the appropriate hook size. This is the paper wrapped around the yarn and normally shows the suggested hook size in millimetres. As a guide to quantities of yarn – I bought four balls of each colour. This should give you more than you need to complete the lapghan. You might even get a cushion out of the leftovers ๐Ÿ™‚

You will use the same basic square throughout this design. Colour changes within each square bring the design to life. I will cover colour changes in a separate post. If, like me, you have a design that includes several plain blocks of a single colour then I suggest you get started with those. Here are the instructions ๐Ÿ™‚

Easy Crochet Lapghan for Beginners – basic square pattern – UK crochet terms.

First round

Make a magic loop and chain three. Photos below should help you with this.

magic loop
make a magic loop as shown
work three chain into the magic loop and it should look like this

Work into the magic loop as follows 2Tr, 2 CH, 3 Tr, 2CH, 3 Tr, 2CH, 3 Tr, 2CH, pull the magic loop closed and join with a slip stitch to the third loop of the starting chain. To join with a slip stitch push the hook through, wrap round the yarn and pull the yarn back through the loop and through the loop on the hook.

first round of lockdown lapghan
first round before closing magic loop
first round with magic loop closed – before slip stitch to join to the start

At the end of this round you should see a square is already starting to form.

lockdown lapghan at end of first round
first round completed with a slip stitch to the starting chain

Second round

Chain 3, work 2 Tr one into each stitch on the previous round. Working into the corner 2 Tr, 2 CH, 2 Tr (as shown below). Work 3 Tr along the next side then into the corner again work 2 Tr, 2CH, 2 Tr. Repeat this pattern working 3 Tr on each side and 2 Tr, 2H, 2 Tr into each corner. When you are at the last corner join with a slip stitch to the top of the starting 3 chain.

first corner round two lockdown lapghan
first corner of second round of Lockdown Lapghan

Third round

Chain 3, work 4 Tr one into each stitch on the previous round. Working into the corner on the odd rounds we will only be working 1 Tr, 2 CH, 1 Tr (as shown below). Work 7 Tr along the next side then into the corner again work 1 Tr, 2CH, 1 Tr. Repeat this pattern working 7 Tr on each side and 1 Tr, 2H, 1 Tr into each corner. When you are round the last corner work 2 Tr and join with a slip stitch to the top of the 3 starting chain.

corners on odd numbered rounds of lockdown lapghan

Fourth round

Chain 3, work 5 Tr one into each stitch on the previous round. Working into the corner 2 Tr, 2 CH, 2 Tr. Work 9 Tr along the next side then into the corner again work 2 Tr, 2CH, 2 Tr. Repeat this pattern working 9 Tr on each side and 2 Tr, 2H, 2 Tr into each corner. When you are round the last corner work 3 Tr and join with a slip stitch to the top of the starting 3 chain.

Fifth round

Chain 3, work 7 Tr one into each stitch on the previous round. Working into the corner on the odd rounds we will only be working 1 Tr, 2 CH, 1 Tr. Work 13 Tr along the next side then into the corner again work 1 Tr, 2CH, 1 Tr. Repeat this pattern working 13 Tr on each side and 1 Tr, 2H, 1 Tr into each corner. When you are round the last corner work 5 Tr and join with a slip stitch to the top of the 3 starting chain.

Sixth round

Chain 3, work 8 Tr one into each stitch on the previous round. Working into the corner 2 Tr, 2 CH, 2 Tr. Work 15 Tr along the next side then into the corner again work 2 Tr, 2CH, 2 Tr. Repeat this pattern working 15 Tr on each side and 2 Tr, 2H, 2 Tr into each corner. When you are round the last corner work 6 Tr and join with a slip stitch to the top of the starting 3 chain.

Seventh round

Chain 3, work 10 Tr one into each stitch on the previous round. Working into the corner on the odd rounds we will only be working 1 Tr, 2 CH, 1 Tr. Work 19 Tr along the next side then into the corner again work 1 Tr, 2CH, 1 Tr. Repeat this pattern working 19 Tr on each side and 1 Tr, 2H, 1 Tr into each corner. When you are round the last corner work 8 Tr and join with a slip stitch to the top of the 3 starting chain.

Eighth round

Chain 3, work 11 Tr one into each stitch on the previous round. Working into the corner 2 Tr, 2 CH, 2 Tr. Work 21 Tr along the next side then into the corner again work 2 Tr, 2CH, 2 Tr. Repeat this pattern working 21 Tr on each side and 2 Tr, 2H, 2 Tr into each corner. When you are round the last corner work 9 Tr and join with a slip stitch to the top of the starting 3 chain.

Ninth round

Chain 3, work 13 Tr one into each stitch on the previous round. Working into the corner on the odd rounds we will only be working 1 Tr, 2 CH, 1 Tr. Work 25 Tr along the next side then into the corner again work 1 Tr, 2CH, 1 Tr. Repeat this pattern working 25 Tr on each side and 1 Tr, 2H, 1 Tr into each corner. When you are round the last corner work 11 Tr and join with a slip stitch to the top of the 3 starting chain.

Tenth round

Chain 3, work 14 Tr one into each stitch on the previous round. Working into the corner 2 Tr, 2 CH, 2 Tr. Work 27 Tr along the next side then into the corner again work 2 Tr, 2CH, 2 Tr. Repeat this pattern working 27 Tr on each side and 2 Tr, 2H, 2 Tr into each corner. When you are round the last corner work 12 Tr and join with a slip stitch to the top of the starting 3 chain.

And there it is, one completed block! The next section is a repeat of this one but gives the US crochet terms so jump down to ‘blocking and finishing’ if you have been following the UK instructions.

Easy Crochet Lapghan for Beginners – basic square pattern – US crochet terms.

First round

Make a magic loop and chain three. Photos above in the UK instructions should help you with this.

Work into the magic loop as follows 2Dc, 2 CH, 3 Dc, 2CH, 3 Dc, 2CH, 3 Dc, 2CH, pull the magic loop closed and join with a slip stitch to the third loop of the starting chain. To join with a slip stitch push the hook through, wrap round the yarn and pull the yarn back through the loop and through the loop on the hook.

At the end of this round you should see a square is already starting to form.

Second round

Chain 3, work 2 Dc one into each stitch on the previous round. Working into the corner 2 Dc, 2 CH, 2 Dc (as shown above in the UK instructions). Work 3 Dc along the next side then into the corner again work 2 Dc, 2CH, 2 Dc. Repeat this pattern working 3 Dc on each side and 2 Dc, 2H, 2 Dc into each corner. When you are at the last corner join with a slip stitch to the top of the starting 3 chain.

Third round

Chain 3, work 4 Dc one into each stitch on the previous round. Working into the corner on the odd rounds we will only be working 1 Dc, 2 CH, 1 Dc (as shown above in the UK instructions). Work 7 Dc along the next side then into the corner again work 1 Dc, 2CH, 1 Dc. Repeat this pattern working 7 Dc on each side and 1 Dc, 2H, 1 Dc into each corner. When you are round the last corner work 2 Dc and join with a slip stitch to the top of the 3 starting chain.

Fourth round

Chain 3, work 5 Dc one into each stitch on the previous round. Working into the corner 2 Dc, 2 CH, 2 Dc. Work 9 Dc along the next side then into the corner again work 2 Dc, 2CH, 2 Dc. Repeat this pattern working 9 Dc on each side and 2 Dc, 2H, 2 Dc into each corner. When you are round the last corner work 3 Dc and join with a slip stitch to the top of the starting 3 chain.

Fifth round

Chain 3, work 7 Dc one into each stitch on the previous round. Working into the corner on the odd rounds we will only be working 1 Dc, 2 CH, 1 Dc. Work 13 Dc along the next side then into the corner again work 1 Tr, 2CH, 1 Tr. Repeat this pattern working 13 Dc on each side and 1 Dc, 2H, 1 Dc into each corner. When you are round the last corner work 5 Dc and join with a slip stitch to the top of the 3 starting chain.

Sixth round

Chain 3, work 8 Dc one into each stitch on the previous round. Working into the corner 2 Dc, 2 CH, 2 Dc. Work 15 Dc along the next side then into the corner again work 2 Dc, 2CH, 2 Dc. Repeat this pattern working 15 Dc on each side and 2 Dc, 2H, 2 Dc into each corner. When you are round the last corner work 6 Dc and join with a slip stitch to the top of the starting 3 chain.

Seventh round

Chain 3, work 10 Dc one into each stitch on the previous round. Working into the corner on the odd rounds we will only be working 1 Dc, 2 CH, 1 Dc. Work 19 Dc along the next side then into the corner again work 1 Dc, 2CH, 1 Dc. Repeat this pattern working 19 Dc on each side and 1 Dc, 2H, 1 Dc into each corner. When you are round the last corner work 8 Dc and join with a slip stitch to the top of the 3 starting chain.

Eighth round

Chain 3, work 11 Dc one into each stitch on the previous round. Working into the corner 2 Dc, 2 CH, 2 Dc. Work 21 Dc along the next side then into the corner again work 2 Dc, 2CH, 2 Dc. Repeat this pattern working 21 Dc on each side and 2 Dc, 2H, 2 Dc into each corner. When you are round the last corner work 9 Dc and join with a slip stitch to the top of the starting 3 chain.

Ninth round

Chain 3, work 13 Dc one into each stitch on the previous round. Working into the corner on the odd rounds we will only be working 1 Dc, 2 CH, 1 Dc. Work 25 Dc along the next side then into the corner again work 1 Dc, 2CH, 1 Dc. Repeat this pattern working 25 Dc on each side and 1 Dc, 2H, 1 Dc into each corner. When you are round the last corner work 11 Dc and join with a slip stitch to the top of the 3 starting chain.

Tenth round

Chain 3, work 14 Dc one into each stitch on the previous round. Working into the corner 2 Dc, 2 CH, 2 Dc. Work 27 Dc along the next side then into the corner again work 2 Dc, 2CH, 2 Dc. Repeat this pattern working 27 Dc on each side and 2 Dc, 2H, 2 Dc into each corner. When you are round the last corner work 12 Dc and join with a slip stitch to the top of the starting 3 chain.

There you are – one finished square!!

Blocking and finishing

‘Blocking’ is important if you want to produce a lapghan that looks really good. When you block your work you set the dimensions of each square and remove any wrinkles and bumps. It is worth taking time over this step. You will need a blocking board and pins. You can pay for specialist equipment but I use children’s foam play floor tiles and dressmaking pins. Any solid surface that will take pins will work but you will be making it damp so bare that in mind!

Pin out each block and give it a little sprinkle of water then leave ideally over night. When you remove the pins you will see that the block has assumed the pinned shape and should now retain this shape (unless it is re-wet). I normally block squares as I make them to avoid having to do all the blocking in one go.

Blocking one of the lockdown lapghan squares on children’s foam play tiles

TIP – when I am making several blocks with the same dimensions I draw the shape on the blocking board and ease each square to those same dimensions. Sometimes there can be slight variation in yarn weight by colour within a yarn brand – although I find Stylecraft is very good on this point with little/no variation. Marking the size on the blocking board ensures you are blocking each square to the same dimensions!

I want to get this pattern up on my blog as soon as possible so I will leave the finishing off for a second post. Hope you don’t mind! Come back to me when you have finished all your blocks and the post should be here!

I really hope you enjoy this easy crochet lapghan for beginners and that you really enjoy making something beautiful in these difficult times. If you would like to try something a little more challenging then you can check out some of my other patterns here Hearts and Stripes Lapghan. Hearts in three sizes. Stars in three sizes. I know that crafting is certainly helping me. Happy crocheting!

Annie ๐Ÿ™‚

Filed Under: Crochet patterns Tagged With: beginner crochet, crochet, easy crochet, easy crochet lapghan, free crochet pattern, Free pattern, free patterns, lapghan

Crochet Stars in Three Sizes

September 13, 2020 by A_Sticky_tape_and_string_girl Leave a Comment

In this post you will find free crochet patterns in UK and US terms for you to make crochet stars in three sizes. I originally started working on these because we had heating on for the first time this year. My thoughts went straight to the making time remaining to me before Christmas ๐Ÿ™‚

However, these stars don’t have to be for Christmas. There are many uses through the year as card toppers, in garlands or as decoration when wrapping presents. They also work as reusable table confetti like the crochet hearts I made last year. You can find the patterns for the crochet hearts in this post – Crochet Hearts in three sizes.

Firstly let me tell you that the stars in the photos here are worked in Sirdar Cotton DK on a 4mm hook. I love this yarn for the stitch definition and the soft texture. Using this yarn the small star is roughly 4cm across, medium star measures 5cm and the largest one is 6cm across. The pattern will work in any yarn quality but the stars will come up different sizes of course.

Crochet Star – three sizes. Patterns in UK crochet terms – (Scroll down for patterns in US instructions)

Small Star – UK instructions

First round – make a magic loop (see below)

making a magic loop
magic loop

Work 2 chain into the magic loop and 9DC.

chain two into the magic loop
chain two
working the first round into the magic loop
work the first round into the magic loop

Pull the magic loop closed and join the first round with a slip stitch to the second of the starting chains.

close the magic loop and slip stitch to finish the round
pull the yarn tail to close the loop and finish with a slip stitch

Second round – Working into the same stitch, CH2, 1TR, CH2 picot*, 1DTR, 1TR. Work a slip stitch into the next stitch. There are eight stitches on round 1 remaining. Repeat the following pattern between the square brackets to the end of the row. [Working all the stitches in the following bracket into the next stitch (1HTR, 1TR, CH2 picot, 1DTR, 1TR), work a slip stitch into the next stitch] x 4. Finish off the yarn and you have your small star.

* work a picot as follows. slip stitch into the chain two from the hook as shown below.

work a slip stitch into the second chain from the hook to form the picot

Medium Star – UK instructions

First round – make a magic loop (see photos above)

Work 3 chain into the magic loop and 9TR. Pull the magic loop closed and join the first round with a slip stitch to the third of the starting chains.

Second round – Working into the same stitch, CH2, 1TR, CH2 picot*, 1DTR, 1TR. Work a slip stitch into the next stitch. There are eight stitches on round 1 remaining. Repeat the following pattern between the square brackets to the end of the row. [Working all the stitches in the following bracket into the next stitch (1HTR, 1TR, CH2 picot, 1DTR, 1TR), work a slip stitch into the next stitch] x 4. Finish off the yarn and you have your small star.

* work a picot as follows. slip stitch into the chain two from the hook as shown above.

Large Star – UK instructions

First round – make a magic loop (see photos above)

Work 3 chain into the magic loop and 9TR. Pull the magic loop closed and join the first round with a slip stitch to the third of the starting chains.

Second round – Chain 2, DC into the same space. Work 2DC into each of the remaining nine stitches then join with a slip stitch to the second of the starting chains.

Third round – Chain 2, 1TR into the same space. Into the next stitch work (1DTR, Chain 3, picot*, Chain 1, 1DTR). Into the next stitch work (1TR, 1HTR). Slip stitch into the next stitch to finish the first point of the star. Work four more points of the star as follows: [ into the first stitch (1HTR, 1TR), into the second stitch (1DTR, Chain 3, picot*, Chain 1, 1DTR), into the third stitch (1TR, 1HTR), work a slip stitch into the fourth stitch] repeat the instructions between the square brackets [ ] three more times and you are done!

* work a picot as follows. slip stitch into the chain two from the hook as shown above.

Patterns in US crochet terms – (Scroll up for patterns in UK instructions)

Small Star – US instructions

small crochet star

First round – make a magic loop (see photos above)

Work 2 chain into the magic loop and 9SC. Pull the magic loop closed and join the first round with a slip stitch to the second of the starting chains.

Second round – Working into the same stitch, CH2, 1DC, CH2 picot*, 1TR, 1DC. Work a slip stitch into the next stitch. There are eight stitches on round 1 remaining. Repeat the following pattern between the square brackets to the end of the row. [Working all the stitches in the following bracket into the next stitch (1HDC, 1DC, CH2 picot, 1TR, 1DC), work a slip stitch into the next stitch] x 4. Finish off the yarn and you have your small star.

* work a picot as follows. slip stitch into the chain two from the hook as shown above.

Medium Star – US instructions

First round – make a magic loop (see photos above)

Work 3 chain into the magic loop and 9DC. Pull the magic loop closed and join the first round with a slip stitch to the third of the starting chains.

Second round – Working into the same stitch, CH2, 1DC, CH2 picot*, 1TR, 1DC. Work a slip stitch into the next stitch. There are eight stitches on round 1 remaining. Repeat the following pattern between the square brackets to the end of the row. [Working all the stitches in the following bracket into the next stitch (1HDC, 1DC, CH2 picot, 1TR, 1DC), work a slip stitch into the next stitch] x 4. Finish off the yarn and you have your small star.

* work a picot as follows. slip stitch into the chain two from the hook as shown above.

Large Star – US instructions

First round – make a magic loop (see above)

Work 3 chain into the magic loop and 9DC. Pull the magic loop closed and join the first round with a slip stitch to the third of the starting chains.

Second round – Chain 2, SC into the same space. Work 2SC into each of the remaining nine stitches then join with a slip stitch to the second of the starting chains.

Third round – Chain 2, 1DC into the same space. Into the next stitch work (1TR, Chain 3, picot*, Chain 1, 1TR). Into the next stitch work (1DC, 1HDC). Slip stitch into the next stitch to finish the first point of the star. Work four more points of the star as follows: [ into the first stitch (1HDC, 1DC), into the second stitch (1TR, Chain 3, picot*, Chain 1, 1TR), into the third stitch (1DC, 1HDC), work a slip stitch into the fourth stitch] repeat the instructions between the square brackets [ ] three more times and you are done!

* work a picot as follows. slip stitch into the chain two from the hook as shown above.

I hope you love these little crochet stars as much as I do. Happy crocheting!

Annie ๐Ÿ™‚

Filed Under: Crochet patterns Tagged With: crochet blog, crochet motif, free crochet pattern, Free pattern, star

Crochet Rope Edging

August 24, 2020 by A_Sticky_tape_and_string_girl Leave a Comment

This three coloured rope crochet edging makes a beautiful finish to any project. I was looking for an neat edge that used all three of the colours from my project. This edging forms a pretty rope effect and although it feels a bit fiddly to start with you will soon find you get into a rhythm.

crochet rope edging
three colour crochet rope edging

The materials I am using in this example are Sirdar Cotton DK and a 4mm hook. These photographs use the following colours, Red (shade 510), Honeysuckle (shade 508) and Citrus (shade 531). The base colour is Vanilla (shade 502).

Three coloured rope crochet edging pattern

Choose your start point and join in the first colour. Make a chain of five stitches and take the hook out of the stitch to leave a loop. Tip – as you work it is easy to pull out stitches so I recommend pulling a bit of thread through to leave a larger loop.

Join in the second colour to the stich alongside your first chain and again make a chain of five stitches then remove the hook.

Finally join in the third colour into the next stitch of your project, making your final chain of five stitches. When you have joined your third colour the work should look like this picture below.

crochet rope edging
three colours joined

Start making the three coloured crochet rope

Next we are going to start to make the rope. Put your hook back into the loop at the end of the first chain you made. In my work above this is the yellow chain. This is where it gets a bit fiddly! I found if I worked slowly at first and kept the colours from tangling, I got into an easy rhythm after a few colour changes ๐Ÿ™‚

With your hook in the loop at the end of the first chain, bring this chain down in front of all the others and put your hook into the stitch next to the third colour. This is the next available stitch on the edge of your project as shown below.

crochet rope edging
hook placement for first twist of the rope

Make a slip stitch by putting your hook into this stitch, wrapping the yarn around and pull back through the work as shown below. Next pull this through the loop on the hook to form a slip stitch.

slip stitch to make the first twist
slip stitch to secure the first twist

Work another five chains with this colour and remove the hook from the work. Your edging should look like this picture below.

crochet rope edging 4
crochet rope edging after the first twist

You have made the first twist and the rest of the crochet rope follows the same method. Put your hook into the end of the chain nearest to the right of the work. Bring the chain to the front of the work and put your hook into the next available stitch to the left of the work. For my example here this means putting the hook into the end of the orange chain. Bring this chain forward and secure the twist with a slip stitch into the stitch next to the yellow chain, as shown in the photos below.

crochet rope edging 5
bring the next chain to the front of the work
crochet rope edging 6
work into the next available stitch
crochet rope edging 7
slip stitch leaving one loop on the hook
crochet rope edging 9
work another five stitch chain and move the hook to the next colour

Finishing your work – Tips

That really is all there is to it. Continue picking up each colour, bringing it to the front of the work and secure with a slip stitch before making a new five stitch chain. You will see your rope start to grow. More pictures below along with a few final tips.

crochet rope edging 10
third twist secured
crochet rope edging 11
keep going in the same way to form the rope

Using the rope edging on the ends of rows side

If you are working along an edge that has the ends of rows rather than a neat set of stitches this can be difficult to space. Measure the gap between two slip stitches of the same colour on your first edge and use that as a guide to place your slip stitches on this edge.

Changing the pattern to suit different weights of yarn or tension

If you find that the tension of the rope doesn’t sit well or look right then adjust the number of stitches you have in your chain. I found five chain stitches was perfect for this Cotton DK. You might need more/fewer if you are working with a different weight of yarn. Just find the right tension by trial and error working a small section then see how the edging sits.

Dealing with corners

If you are working on a square or rectangular project you will have to deal with a 90 degree corner or rather four corners! You should find that if you work three colours into one stitch either side of the corner the rope will continue round the corner. This means that you work all three colours into the last stich of the row before the corner. Turn and again work all three colours into the first stitch on the next side. Please let me know if you would like to see photos of this and I will add them or put up a separate post.

Adding in more colours

I only used three colours in my design here but you could work a rope with more colours or fewer. Simply adjust the length of chain you use to give the desired effect.

I think that is it for now. I put up a pattern for flower petal edging if you would like to try something different. You can see that pattern here – flower petal edging. Please let me know if you like this edging pattern and if there is anything else I can help with. Happy crocheting!

Annie ๐Ÿ™‚

Filed Under: Crochet patterns Tagged With: crochet blog, crochet design, crochet edging, free crochet pattern, Free pattern

Flower Petal Edging Pattern

July 28, 2020 by A_Sticky_tape_and_string_girl Leave a Comment

I was absolutely thrilled to receive a comment on one of my early posts requesting this Flower Petal Edging Pattern. This edging completed my Sunshine Flower Blanket which you can see as it grows in these posts. These goes back to the early days of my blog ๐Ÿ™‚

Sunshine Flower Blanket

Sunshine Flower Blanket – Progress!!

The Edging takes the theme of the flower squares I used to make the blanket. You can find the flower square pattern in a book by Tracey Lord called A Square a Day. I love this book and have used it as a source of inspiration many times.

Here is the pattern. For your ease I will list it twice using UK then US terms. The pattern uses three colours but you could keep to one or two if you prefer. My blanket was worked in Sirdar Cotton DK which is a glorious yarn with beautiful stitch definition and a lovely soft texture. I used their cream shade called Vanilla 502 for the background for the blanket.

The colours I used for the edging are:

  • Yellow – Yarn A – Citrus 531
  • Orange – Yarn B – Honeysuckle 508
  • Red – Yarn C – Red 510

Before we start there is a stitch here that you might not have come across. Picot 2 or Picot 3. These little stitches create the peak of each petal. I used Picot 2 on the orange round of petals and Picot 3 on the final round of larger red petals. To perform this stitch simply chain 2 for picot 2 and then slip stitch into the first chain stitch. For Picot 3, you guessed it – chain 3 then slip stitch into the first chain stitch. The stitch creates a little knot which adds texture and definition.

working the slip stitch to form the Picot 2.

Flower Petal Edging pattern – UK crochet terms

First round

Using Yarn A join the yarn to the edge of your work with a slip stitch and work two chain. Work a row of Htr into each stitch of the edge of your project.

Second round

TIP – there is no need to start each round in the same place. Moving the start point around the project will spread the positioning of the ends you will need to weave in and also improves the overall uniform appearance.

Using Yarn B join in the yarn to the edge of your work with a slip stitch chain two, (1Tr, picot 2*, 2Tr) all into the same stitch, 1Htr, slip stitch. This should give you your first petal. The first petal is slightly different as it has the starting chain so I will write out the repeating petal pattern next. Each petal is worked over four stitches of the row below. (*see instructions above)

[1Htr, (1Tr, picot 2, 2Tr) all into the same stitch, 1Htr, Slip stitch]

Repeat this petal all the way around your project.

Third round

Using Yarn C – join in the yarn between any two petals with a slip stitch working into the stitch from the first round. The pictures show where you should put your hook.

Work 5 chain and then 1DC between the next two petals. Again you are working into the stitch you created on the first round. This round should be super quick and it forms the foundation for the final round of petals.

The chain loops might be at the front or the back of your work once you finish this round. It doesn’t really matter where they end up – mine are normally at the front. Push them to the back as you work the final round, pulling the petals from the previous round to the front.

Fourth and final round

Keeping with yarn C working into the chain loop you created on the last round in each chain loop work as follows: 1DC, 3Tr, picot 3, 1Dtr, 3Tr, 1DC. A total of 8 stitches into the chain loop then move onto the next chain loop and repeat all the way around your project.

picture shows the front of the work – working the petals into the chain loops

Finish off the ends and you are done!!

Flower Petal Edging pattern – US crochet terms

First round

Using Yarn A join the yarn to the edge of your work with a slip stitch and work two chain. Work a row of HDc into each stitch of the edge of your project.

Second round

TIP – there is no need to start each round in the same place. Moving the start point around the project will spread the positioning of the ends you will need to weave in and also improves the overall uniform appearance.

Using Yarn B join in the yarn to the edge of your work with a slip stitch chain two, (1Dc, picot 2*, 2Dc) all into the same stitch, 1HDc, slip stitch. This should give you your first petal. The first petal is slightly different as it has the starting chain so I will write out the repeating petal pattern next. Each petal is worked over four stitches of the row below. (*see instructions above)

[1HDc, (1Dc, picot 2, 2Dc) all into the same stitch, 1HDc, Slip stitch]

Repeat this petal all the way around your project.

Third round

Using Yarn C – join in the yarn between any two petals with a slip stitch working into the stitch from the first round. The pictures above in the UK terms section show where you should put your hook.

Work 5 chain and then 1SC between the next two petals. Again you are working into the stitch you created on the first round. This round should be super quick and it forms the foundation for the final round of petals.

The chain loops might be at the front or the back of your work once you finish this round. It doesn’t really matter where they end up – mine are normally at the front. Push them to the back as you work the final round, pulling the petals from the previous round to the front.

Fourth and final round

Keeping with yarn C working into the chain loop you created on the last round in each chain loop work as follows: 1SC, 3Dc, picot 3, 1Tr, 3Dc, 1Sc. A total of 8 stitches into the chain loop then move onto the next chain loop and repeat all the way around your project. See picture above in the UK terms section.

Finish off the ends and you are done!!

I hope you love this edging as much as I do. Happy crocheting!

Annie ๐Ÿ™‚

Filed Under: Crochet patterns Tagged With: crochet, crochet design, crochet petal, edging, flower petal, flower petal edging, Free pattern, petal edging

Crochet Chain Garland

May 31, 2020 by A_Sticky_tape_and_string_girl Leave a Comment

In an attempt to help reduce plastic pollution, I have been making sustainable decorations including this crochet chain garland. This is another fun, quick, easy make. I made the example here in sustainable cotton as part of a set of decorations I designed with weddings or girls bedrooms in mind.

Crochet Chain Garland with ‘table confetti’ hearts

If you like the little ‘table confetti’ hearts, the pattern for those is here.

This idea would also work with bright colours and different weights of yarn. The pattern is a fab stash buster as you can mix and match any colours you have. Each link in the chain requires only a small amount of yarn. I plan to make a super chunky version with the left over yarn from all my rainbow projects which you can see here

Crochet Chain Garland Pattern

Note – this pattern uses DK weight yarn and a four mm hook. However it can be adjusted to any yarn weight – instructions at the bottom.

For the first link.

Chain 35 and join to the first chain with a slip stitch.

First round – chain two. Work DC into the each chain (SC in US terms). Finish the round with a slip stitch to join to the top of the first stitch.

Second round – chain three. Work TR (DC in US terms) into each of the DC on the previous row. (SC in US terms). Again finish the round with a slip stitch.

Third and final round – work a round of DC (SC in US terms) as round 1. Finish with a slip stitch and tie off the yarn. You have made your first link.

Second and all subsequent links

Start with a chain the same length as your first link. If you are using the same weight yarn as I used that means a chain of 35. The only difference between this and the first link is that we need to join to the rest of the garland. To do this, thread the chain through the first link before you make the slip stitch into the first chain to form the loop.

Continue to form this link in the same way as you made the first. Each link in the chain is free to move through its neighbours. They are not attached – just threaded together.

And that is it! Continue for as many links as you like. Make patterns with the colours or make them happily random with any remnants from your stash!

Changing the pattern to suit different weights of yarn.

Consider what size of link will work best for the yarn weight. I find that links work well when the length of the link is eight to ten times the height. You can work out how many stitches it takes to make the size you require based on the tension square instructions on the ball band.

Example – Super Chunky – Lion Brand Yarns – Hometown USA. The ball band has a 10cm tension square of 12 rows x 9 stitches. The pattern gives the equivalent of four rows so the links would be c 3.3 cm high.

I want each link to be 8 to 10 times as long as they are tall so I need them to be 27cms which means 30 stitches. This is super chunky yarn so these chains will be HUGE – but I hope that gives you the method to use to adjust the pattern.

Hope you enjoy making these happy garlands!

Annie. ๐Ÿ™‚

Filed Under: Crochet patterns, Uncategorized Tagged With: bunting, crochet, crochet design, crochet garland, free crochet pattern, Free pattern, handmade, sustainable decorations, sustainable wedding, wedding

  • « Go to Previous Page
  • Page 1
  • Page 2
  • Page 3
  • Page 4
  • Page 5
  • Page 6
  • Go to Next Page »

Footer

Newsletter

Copyright © 2026 ยท Genesis Sample on Genesis Framework ยท WordPress ยท Log in