• Skip to primary navigation
  • Skip to main content
  • Skip to footer

Stickytapeandstring

Created with WordPress managed by 1&1

  • Craft projects
    • craft business tips
    • craft blog
    • Crochet patterns
    • Upcycling
    • craft with kids
  • Blogging
    • New to blogging
    • Blog diary
  • Bullet Journal
  • About me
  • Welcome!!

Craft

Heart square

June 16, 2018 by A_Sticky_tape_and_string_girl Leave a Comment

Hello, in this post I am sharing a free pattern for a heart in a square with you.     A few weeks ago I designed a crochet heart and shared the pattern as a stash busting project.   I wanted to include my stash busting hearts in my Shades of the Rainbow blanket so I have designed a pattern to put the hearts into a square of the same size as my sample squares.

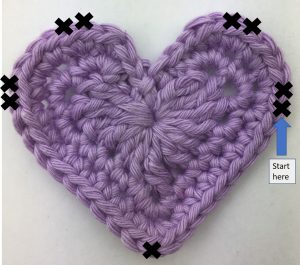
Here is a link to the heart pattern.   This pattern starts with a completed heart.   The heart you made should look like this.   I have also included the heart pattern again at the bottom of this post.

The picture above shows the start point for this pattern and the points where the outside border joins the heart are indicated with an X.

Heart in a Square pattern – UK version (US version below)

First round – slip stitch into the side of the heart in the stitch indicated in the picture above.  CH2, DC into next stitch, CH5, miss three stitches, TR into the next stitch (at the top right of the heart), DC into next stitch, CH5, DC into stitch at the top of the left side of the heart, TR, CH5, miss three stitches, 2DC, CH12, DC into the bottom stitch of the heart, CH12 and slip stitch to the second of the chains that started the round to join to your start point.

Second round – CH2, DC, (2DC, CH2, DC) into the corner, 2DC at the top right hand side of the heart, 5 DC across the centre/top of the heart, 2DC into the top left hand side of the heart, (DC,2CH,2DC) into the left hand corner, 2DC, (7DC, 2CH,5DC) into the bottom left corner, DC into the stitch at the bottom of the heart, (5DC,2CH,7DC) into the bottom right corner and slip stitch to the second of the chains that started the round to join to your start point.

Third round – CH2, DC all round working 2DC,2CH,2DC into the corner chains.

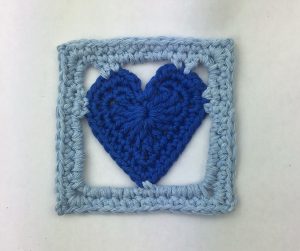
You should end up with a square that looks like this ๐Ÿ™‚

Heart in a Square pattern – US version

First round – slip stitch into the side of the heart in the stitch indicated in the picture above.  CH2, SC into next stitch, CH5, miss three stitches, DC into the next stitch (at the top right of the heart), SC into next stitch, CH5, SC into stitch at the top of the left side of the heart, DC, CH5, miss three stitches, 2SC, CH12, SC into the bottom stitch of the heart, CH12 and slip stitch to the second of the chains that started the round to join to your start point.

Second round – CH2, SC, (2SC, CH2, SC) into the corner, 2SC at the top right hand side of the heart, 5 SC across the centre/top of the heart, 2SC into the top left hand side of the heart, (SC,2CH,2SC) into the left hand corner, 2SC, (7SC, 2CH,5SC) into the bottom left corner, SC into the stitch at the bottom of the heart, (5SC,2CH,7SC) into the bottom right corner and slip stitch to the second of the chains that started the round to join to your start point.

Third round – CH2, SC all round working 2SC,2CH,2SC into the corner chains.

In case there are issues with the heart link or just in case you would like this pattern all in one place – here is the heart pattern:

Heart Pattern

UK terms

Make a magic loop, chain 3 and working into the magic loop, 3 dtr, 3tr, chain 1, 1dtr, chain 1, 3tr, 3dtr, chain 2, slip stitch into magic loop and pull the thread to close the centre of the heart.

second round – 2 sl stitch into the gap behind the three chain from the first round.  3dc into the next stitch (top of the left side of the heart), 3 dc into the next stitch and 2 dc into the following stitch.   Work 4 dc to take you to the bottom loop of the heart.  3dc into the bottom stitch of the heart, 4 dc, work 2dc, 3dc, 3dc into the next three stitches, 2 sl stitches and one final slip stitch into the centre of the heart.

third round – 2 slip stitches then 2dc into the next five stitches (around the top of the left side of the heart) 7 dc, 3dc into the bottom stitch of the heart, 7dc, 2dc into the next five stitches, 2 slip stitches and finish off to complete the heart.

US terms

Make a magic loop, chain 3 and working into the magic loop, 3TRC, 3DC, chain 1, 1TRC, chain 1, 3DC, 3TRC, chain 2, slip stitch into magic loop and pull the thread to close the centre of the heart.

second round – 2 sl stitch into the gap behind the three chain from the first round.  3SC into the next stitch (top of the left side of the heart), 3 SC into the next stitch and 2SC into the following stitch.   Work 4SC to take you to the bottom loop of the heart.  3SC into the bottom stitch of the heart, 4SC, work 2SC, 3SC, 3SC into the next three stitches, 2 sl stitches and one final slip stitch into the centre of the heart.

third round – 2 slip stitches then 2SC into the next five stitches (around the top of the left side of the heart) 7 SC, 3SC into the bottom stitch of the heart, 7SC, 2SC into the next five stitches, 2 slip stitches and finish off to complete the heart.


That’s all for now.    I will be sharing my completed blanket in a few weeks – just a few more squares to go – and a lot of ends to tie in!!

Happy crocheting!

Annie ๐Ÿ™‚

Filed Under: Craft projects, Crochet patterns Tagged With: block, commuter crochet, Craft, crochet, design, Free pattern, handmade, small crafts, squares, stash busting

27 May 2018

June 2, 2018 by A_Sticky_tape_and_string_girl Leave a Comment

Hello ๐Ÿ™‚

Welcome to my second update.   I hope you have had a happy, productive week?   I have been busy finishing the little bags I started last week but Sunday did not start well.    I left my crochet in a bag in our living room over night, and this is what I found the following morning….

and this is the likely culprit!    We have three dogs, a mum and two pups.   The pups are just over a year old and still love to chew things!   The puppy in this pic is called Poppy and she is the worst for chewing things.   So far she has demolished various bags and shoes, including some expensive boots and the only pair of pricey sunglasses I have ever bought!    Our fault for leaving things in her reach I suppose.

Luckily for me my Mum loves to untangle yarn so I gave the tangled mess to her and now have a nice tidy ball again.     I finished the bags and basic bag pattern and put a blog post out about that.   bag pattern post.

I also made a few discs and hearts in the process – the discs were the bottom of the bags but I like the look of them on their own.   I might work them into a project of some kind but haven’t quite figured out what yet.    The hearts started out as motifs for the bags, from a basic pattern I found online.  I wasn’t very happy with the pattern so I adapted that to make a few medium and larger ones.  The larger ones are a bit more stable, I am very pleased with the pattern I created.

I am going to experiment with a heavier weight of yarn next.    I think these would make lovely table decorations for a wedding, baby shower or birthday.   I will write up the heart pattern so I can share it with you in a future post.

I made some in brighter colours too in Drops Paris yarn that I am worked sample squares in for a blanket.    I might try to work these hearts into the blanket design!

The other project I have been working on since I spoke to you last, is some bunting for a family birthday.    I put up a separate post on this as I managed to complete the work.   The bunting looks lovely and will be able to be reused unlike the tacky plastic stuff I normally buy.    I have been considering a design for crochet balloons but I am not sure I have that sorted yet ๐Ÿ™‚   My post on the bunting includes the basic flag pattern and explains how I joined them into a garland.    You can read that post here  Bunting Pattern post

Last week I promised an update on my blog goals.    I put quite a bit of thought into this but I haven’t managed to create the bullet journal pages yet.  I am trying to keep it simple as I do find that keeping a bullet journal takes a lot of time.    The time I spend is lovely relaxing mindful time but I am not sure I have enough time available to devote so much of it to keeping a track of progress.   I will try to get these trackers done for next week’s update.   I do worry that I would make more progress if I didn’t spend so long tracking it ๐Ÿ™‚

Status today – I have 544 Pinterest followers so I put on 22 this week.   Nothing exciting has happened with AdSense so I am still on 16p ๐Ÿ™‚   I am getting a few page views, around 80 per week on average but no clicks.     I need to do some research on how to improve that if I want to achieve my goal of being able to spend more time on my crafting and blogging.   Maybe the adverts are not relevant enough.

I haven’t read up on mailing lists yet but mean to do that this weekend so watch this space on that one.   I haven’t listed anything new on Etsy either – I plan to write up the more complicated bag instructions along with some edged bunting and options for decoration then I will list both patterns.    I could list the bunting for sale but I want to use it at home – I will have to make some more!!

Finally, I was soooo thrilled to get a response to my first weekly update so this week I am planning to do a bit more research on my fellow crochet bloggers and leave a few comments on their posts, to see if I can make new connections and support people who are working on similar projects.   That’s all for now – more next week!

Happy crocheting!

Annie ๐Ÿ™‚


Filed Under: craft blog, Craft projects Tagged With: bags, beginner blog, Birthday, bunting, commuter crochet, Craft, crochet, design, Free pattern, handmade, small bags, stash busting, wool eating puppies

wedding favours

May 27, 2018 by A_Sticky_tape_and_string_girl Leave a Comment

Hello ๐Ÿ™‚   The UK has just been through the most amazing wedding fever!    I don’t know anyone who is getting married soon but wanted to put a bit of time in on a wedding project so I came up with these little bags that could be used for wedding favours or if made a little larger could be given to flower girls to carry.

I have a huge stash of yarn oddments and managed to find some lovely baby pastel colours for this batch but the bags would also look good in bold colours to match any theme.

I will share the basic bag pattern here but as you can see I enjoyed playing around with the design to add in textures and features.    The yellow bag has a heart trim around the top.   The purple bag has a row of hearts around it.    The pattern I am sharing makes the little pink bag the one with the heart motif attached in the photo below.

The pattern is written in UK notation.   For US terms please note:

DC means SC in US notation

TR means DC in US notation

Bag Pattern – start by making a magic circle, chain 3 and work 17 Tr into the circle. Close with a slip stitch into the third chain from the start.

Pull the circle closed.

Work rounds as shown below, each time finish the round by joining to the chain with a slip stitch.

round 2 – chain 1 and work a round of DC, two into each of the stitches in the circle.

round 3 – chain 2 and work a round of TR

round 4 – chain 1 and work a round of DC into the back loop only of the row below.

round 5 – chain 1 and work a round of DC through both loops of the row below

round 6 – chain 2, work a round of TR into both loops of the row below

round 7 & 8 – chain 1 and work a round of DC through both loops of the row below

repeat rows 6 to 8 twice more.

round 15 – chain 4, miss one stitch and work 1 TR into the next.  (Chain 1, miss one stitch and work 1 TR into the next) repeat to the end of the round and join to the third stitch of the first chain with a slip stitch.   This creates the round of ‘holes’ that we will use to thread the ribbon tie through.

round 16 & 17 – repeat round 7

round 18 – repeat round 6

round 19 – finish the work with a row of slip stitches around the top.

Ribbon ties – you could use ribbon to match any theme or make your own ‘ribbon’ using a row of chain.   I found that a chain of 70 was about the right length but you can judge this for yourself.

Hope you like these little bags.    I am going to be making more during the week and will put a few more patterns up for sale in my Etsy shop when I have written them up.

If you want to read about some of the challenges I have had when it comes to crochet in a house with puppies then please check my weekly blog.   Happy crocheting!

Annie ๐Ÿ™‚

Filed Under: Craft projects, Crochet patterns Tagged With: bags, commuter crochet, Craft, crochet blog, design, favours, Free pattern, handmade, small bags, small crafts, stash buster, stash busting, weddings

Birthday bunting – free pattern

May 27, 2018 by A_Sticky_tape_and_string_girl Leave a Comment

I would like to share with you a free pattern for my birthday bunting. ย  We have a happy day coming up in our household. ย ย  Every year I buy trashy plastic decorations and would like to stop! I have seen lots of news articles about the impact of plastic on the environment. This made me wonder whether I could make some bunting that we could re-use and this is the result. ย ย  I am quite pleased with it ๐Ÿ™‚

Firstly I made the basic flags. ย  Working in double knitting weight yarn. I used yarn from my stash. If you are buying new, I do recommend the Special DK by Stylecraft. This yarn is great value and comes in a wide range of colours. I will leave a search link below. ย  If you click on the link it will take you to the current offers Amazon have for this yarn. Please note any links in my posts may give me a small income at no additional cost to readers. You could make these even more sustainably by using recycled yarn. Yarn recycling is a fun hobby of mine and you can read about it, including methods and tips here.

Birthday bunting – free pattern starts here!

UK/(US) instructions – Basic flag pattern work as follows – using a 4mm hook and DK yarn

Chain 39 (note this is a chain of 37 with two for the turn)

Work one row in DC (US terms SC) starting with the third chain from the hook

Turn, chain two. Work one row in DC (US terms SC) starting in the top of the second DC on the row below.

Turn, chain three. Work one row in TR (US terms DC) starting in the top of the second DC on the row below.

Repeat – so that you are doing two rows of DC (US terms SC), followed by a row of TR (US terms DC). At the start of each row, reduce one stitch by missing the first stitch of the row and working into the second.

As you repeat this pattern you will find each time you work a row of TR (US terms SC) you will have 3 stitches fewer than you had on the last row of that type. ย  Eventually you will get to a row of trebles where you only have 2 stitches to work and at that point you can finish off the work.

Making up the Bunting

To make the top of the bunting I started with a chain of six and formed a loop. ย  I then worked 30 chain before working 37 DC (US terms SC) across the top of the first flag using DC (US terms SC). ย  Put in 10 chain between each flag taking care not to allow the chain to twist. ย  Carry on until you have included all the flags you need. At the end work 30 chain then six more chain. Slip stitch into the first of these last six to make a loop.

Finally, work 12 DC (US terms SC) into the loop formed by the six chain and then work DC (US terms SC) all along the bunting to the end where you need to work 12 DC (US terms SC) into the final loop and slip stitch to finish off.

If you wanted to make smaller bunting then simply start with a smaller number of stitches.

Decoration is optional depending on the occasion.   As this is for a birthday I wanted to include the lettering.    Initially I worked up the letters in free form crochet but I wasn’t very happy with the result so I used felt instead.   This also made it a bit quicker to make.   I edged the felt letters with blanket stitch in the same colour way as a contrast.    Here is a close up of the ‘Happy’ ๐Ÿ™‚

And on that note I will bring the post to a close – please let me know how you like the bunting. ย  I will be putting it up on my Etsy page which you can see here. Happy crocheting!

April 2020 update – I am reusing this pattern to make rainbow bunting to show support for the medical profession and all carers as the world fights Covid-19. Pattern to follow.

Annie ๐Ÿ™‚

Filed Under: Craft projects, Crochet patterns Tagged With: Birthday, bunting, commuter crochet, Craft, crochet, design, Free pattern, handmade, small crafts, stash busting

20 May 2018

May 27, 2018 by A_Sticky_tape_and_string_girl 4 Comments

Hello ๐Ÿ™‚

I have decided to keep a log of my progress as I build my blog and Esty shop.  I will  share my experience here, in case anything I learn can help anyone else. This is my first weekly update post.   I might need to split the content between the nuts and bolts of blogging and the crochet/knitting design work as I am not sure anyone would want to read all of it!   I am not sure anyone will want to read any of it if I am honest but I am putting it out there in hope ๐Ÿ™‚

So far I have only written a post when I had a project ready to share.  That makes weekly posts tricky as there are some weeks when I do not feel I have anything at the right stage.   You will see from these updates that I have a bit of a problem with focus ๐Ÿ™‚ I tend to work on several projects at once and I am not much of a completer finisher.    Does anyone else have a problem with that?

I work full time and jam my crafting into the corners and spare moments of my life. I generally get a good amount of time to spend on my crafting and blogging at the weekend.  During the week I spend two hours a day on the train travelling to work.   I am normally surrounded by sleeping commuters!  I took the decision when I first started in this job, that I would not waste those two hours a day.

One of my tasks each weekend is to get myself set up with projects for the train.   I need the projects to be small and easy to carry.    I generally get a seat on the train but I don’t get much elbow room so the work needs to be compact and not need laying out.   This week I have been working on little crochet bags.    I started with a basic pattern which I will share in a separate post.    I worked up a number of variations.    I thought that these could be used for wedding favours.   We just had a bit of royal wedding fever here in the UK so that was what set me off!

I am still working on designs for my sample squares blanket.   I haven’t managed to get to a design I really love yet so I put the project on hold.    I started with the layout below then edged a number of squares in black and wasn’t sure I liked that look.

I think I am going to ditch the black edges and join with white instead.   Maybe it is because we are coming into summer and the black just looks too heavy.

I am progressing my Spring Flowers Blanket I completed all the flowers for one row last week.    I have joined them now and I am working on the next part of the design.   These colours really make me happy.    I was going to pick up a row of chain after the flowers but I think it will be neater if I start in the other direction and mirror the panel I just made.    My project for the train this week will be another set of flowers to make a new row across the work.    I am going to put in some zig zag rows this weekend.   It has to be a weekend job as the work is too big now to take on the train!

Every week I like to do a bit of research on blog or Etsy tips.  I read an article this week on Etsy success which said that you need c200 items listed to start to get a higher chance of sales.    I was shocked.   That is a huge number of listings.   I am currently at 10!   I think it will take about two years of work to get me to the 200 listings point

I do have a lot of patterns in draft that I plan to list and a number of those could be projects that people could give as Christmas presents.   It sounds dreadful to be thinking of Christmas in May but given the time it takes to produce items I think it is a good time to be planning and starting to make gifts.    This is a link to my shop in case you want a look.   Stickytapeandstring

One of the problems I used to have with my blog and Pinterest posts is with photography.    I have now invested in a light system and have a small ‘studio’ set up in a corner of my bedroom that allows me to take great photos of small and medium sized work.   I bought the kit on Amazon – it was a lot cheaper than I expected.   Problem solved!!

I have included an affiliate link here to the type of kit I bought, which if you find the link helpful, allows me to get a bit of income whilst not costing you a penny more than you would pay anyway.

The problem I haven’t been able to crack so far is how to photograph really  big items.   My sunshine flower blanket looks lovely in real life but I cannot get a decent picture of it to list on Etsy.   I might take it into the garden on a sunny day and see whether sunlight does the trick!

When I am travelling to work I listen to audio books.   After a phase of murder mystery type books I have moved on to self improvement.   Everything I have read/heard tells me that I have more chance of success if I write my goals down so I am working on a bullet journal page to do just that.     I will post an update on this next week.   I love my bullet journal and have a board on Pinterest to keep all the inspiring ideas that I see.   Many of them seem to need more artistic ability than I possess but a lot of the pages can be copied.   Working on the bullet journal is an exercise in mindfulness all on its own and I find it very relaxing but it is a bit of a drain on time if I allow it to be!  Pinterest board link here – Bullet Journal.

I will share my progress against my goals each week once I have set those goals.   For now I can give a status report.    I have 522 Pinterest followers and 10 Esty listings with no sales.    I do not have any blog subscribers yet but plan to start a mailing list next week.   I rarely get comments on my blog and haven’t really looked into how to improve that yet.    I signed up with AdSense a couple of months ago and so far my cumulative earnings are 16p ๐Ÿ™‚   The only way is up!!

I think I had better stop writing now and go and make something.

More next week,

Annie ๐Ÿ™‚


Filed Under: craft blog, Craft projects Tagged With: beginner blog, blankets, commuter crochet, commuting, Craft, crochet blog, productivity

Stripes Scarf – Blue

May 6, 2018 by A_Sticky_tape_and_string_girl 2 Comments

Here is a blue version of my Stash Buster Scarf.   I wrote up the pattern that I created when I made the pink/purple version and realised that I didn’t have yarn quantities so I made it up again in blue so I could get the weight of yarn required.    I also took photos during the making process so that I could add them to the pattern.

The pattern uses five colours and I happened to have four blue shades in my stash so went with those plus white to make five colours for this design.

I wanted to be able to explain in pictures the way that I finished the scarf off without needing to weave in ends.   I also wanted to show how I added in additional yarn to bulk out the fringing.    The finished pattern is up on my Etsy store which you can reach on the following link.

Stash Buster Scarf Pattern

This pattern is very easy so would suit a beginner and can be made up in whatever colours you choose.   Sounds dreadful to be thinking about Christmas as we are in May currently but I think this would make a lovely handmade gift and you can pick a colourway to suit the person it is for.

I have listed the pattern on Etsy but you can grab it here for free on this download. Stripes scarf (18494 downloads )
Happy Crocheting!

Annie ๐Ÿ™‚


Filed Under: Craft projects, Crochet patterns Tagged With: Craft, crochet, design, Etsy, handmade, scarf, scarves, stash busting, yarn

  • « Go to Previous Page
  • Page 1
  • Page 2
  • Page 3
  • Page 4
  • Go to Next Page »

Footer

Newsletter

Copyright © 2026 ยท Genesis Sample on Genesis Framework ยท WordPress ยท Log in