• Skip to primary navigation
  • Skip to main content
  • Skip to footer

Stickytapeandstring

Created with WordPress managed by 1&1

  • Craft projects
    • craft business tips
    • craft blog
    • Crochet patterns
    • Upcycling
    • craft with kids
  • Blogging
    • New to blogging
    • Blog diary
  • Bullet Journal
  • About me
  • Welcome!!

crochet

2 June 2018

June 10, 2018 by A_Sticky_tape_and_string_girl Leave a Comment

Hello 🙂  Welcome to the third weekly update on my journey to being a full time craft blogger and designer.    Ooooh that sounds exciting when written down….  but to put it into perspective, this journey could take me the remainder of my working life and I might not actually be a full time craft blogger until I retire from paid employment in my 70’s!

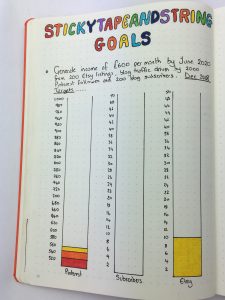
This week I have been working on defining my goals and developing a tracker so I can measure progress.   Some of my goals feel like an awfully big stretch from where I am now but all the advice out there says to aim high!   The goals needed to be broken down into smaller targets for the next six months.   Here they are from my bullet journal…..   I will be adding to these targets as I work out what is most important and what works.

One of the top tips for beginner bloggers is to set up and manage your own mailing list.   I learnt quite a lot this week whilst researching  and setting up my mailing list.  If you are reading this you might have been invited to join mine!    I hope you will join 🙂  I will write a separate post on this in a couple of weeks when I can comment on how well it is working for me.

Focussing on the technical side of my blog this week I have also been researching hints and tips for bloggers on Pinterest.   There seem to be so many blogs out there about blogging and many of them are promoting courses that claim to enable bloggers to turn their hobby into full time income.   The courses are expensive!!   I am not against investing in my blog.   I have spent a little already on getting set up with my own website using 1&1  there is a link to 1&1 below (note this is an affiliate link which could give me a little income at no increased cost to you).   1&1 have several low cost entry plans where you can set up and really own your blog from the start giving more flexibility and protection for your work.   Many of the plans come with free domain names and it is good fun checking out which names are available – checking costs nothing 🙂

1&1 Ionos

At the moment, I believe that there is so much more I can learn from reading and researching without spending money on courses.   I have a long list of things to work on and I will share with you anything that makes a big difference.    The top tips I will be working on this week are as follows:

  • Improve board descriptions on Pinterest – include key words
  • Apply to join group boards – although this is getting a mixed press currently
  • Declutter my blog

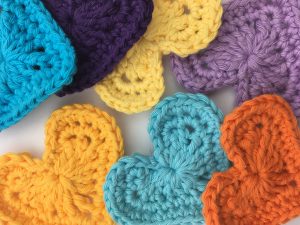
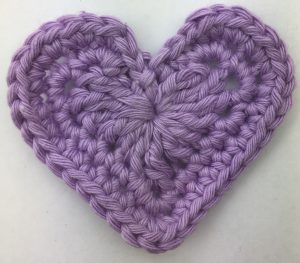
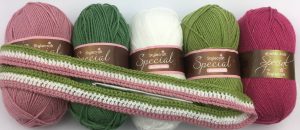
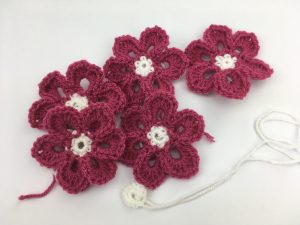
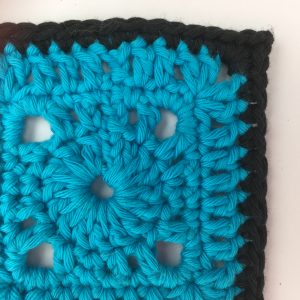
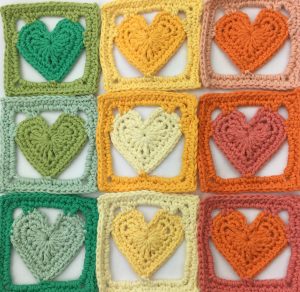
On the creative side this week I have merged two projects!!   My sample blanket that was stalled because I couldn’t come up with a design I really liked, and the heart patterns from last week.   I have made a pattern for the heart within a square and it is the same size as the sample square pattern I produced earlier this year.   Here is a link to the free pattern for the sample square.   I will be writing up the pattern for the heart square this week so I can share it in next week’s update.

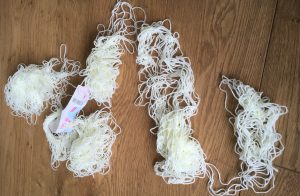
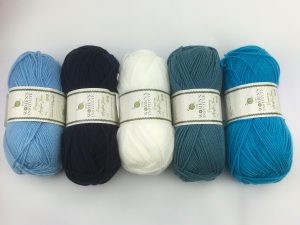
I have worked up a few heart squares in the Drops Paris – 100% cotton yarn and here they are laid out in the start of the design I plan to complete.   This is a great stash busting project.   The other really good thing about this project is that it is perfect for working up on the train!   I have worked out that I am going to need more yarn though…. not a help to my stash busting efforts.    I have a room full of yarn and seem to keep needing to buy more!! 🙂

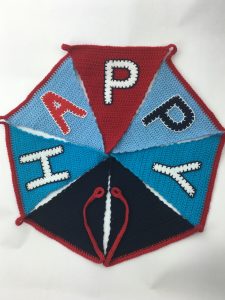
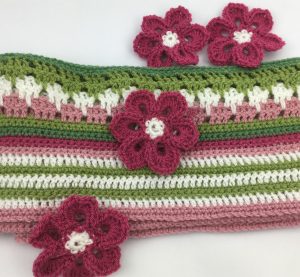
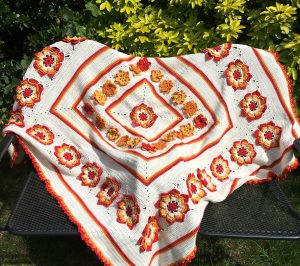
I picked up a tip from Kat over at KrazyKabbage on the best conditions to photograph large projects outside and I have managed to take this photo of my big Sunshine Flower blanket.   This is the best photo I have taken so far – very happy with it.

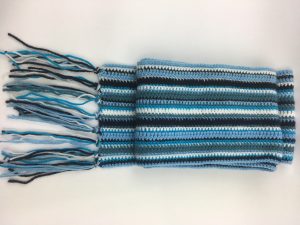
In the evenings this week I worked a few more sections of my Spring Flower blanket.   I am really pleased with the way this is coming on and I am documenting the pattern at every stage so I will have another item to list on Etsy when I am done.  I don’t have a photo this week but will share again next week.

I will probably list the blanket on Etsy too but when I cost the blankets in terms of the time they take to make, plus materials, the price I need to charge makes them unaffordable.   I am listing them with little hope of a sale but at least they show the patterns.

Finally a weekly status report.  I am hugely excited by the leap in my advertising income which has almost doubled…… to 31p  🙂

  • Pinterest followers – 556
  • AdSense income to date – 31p
  • Subscribers – 1 (me – it was a test)
  • Etsy listings – 10
  • Etsy sales – 0
  • Page views last seven days – 34

I am starting to track page views – apparently this is key to success.    Stickytapeandstring.co.uk is currently running at around 140 page views per month.   Some bloggers quote 1000 per day as being the level you need to be taken seriously…. As I say – this is not going to be a short journey!    More next week….

happy crocheting and happy blogging,

Annie 🙂

Filed Under: Blog diary, Blogging Tagged With: beginner blog, blankets, blocks, commuter crochet, crochet, design, handmade, ideas, projects, stash busting

Hearts

June 3, 2018 by A_Sticky_tape_and_string_girl 2 Comments

I looked for a heart motif online and couldn’t find one that was quite right so I made my own!    It is very quick to make up and you can stop before the last row if you need a slightly smaller version.

I am addicted to making them now! These hearts are great for stash busting if, like me, you keep every single scrap of spare yarn and have lots of tiny oddments.   You could use the finished hearts as table decorations, charms or motifs for applique.   Made up in heavier yarn they could even be used as coasters but might need a few more rows adding to make them large enough.

Here is the pattern:

UK terms

Make a magic loop, chain 3 and working into the magic loop, 3 dtr, 3tr, chain 1, 1dtr, chain 1, 3tr, 3dtr, chain 2, slip stitch into magic loop and pull the thread to close the centre of the heart.

second round – 2 sl stitch into the gap behind the three chain from the first round.  3dc into the next stitch (top of the left side of the heart), 3 dc into the next stitch and 2 dc into the following stitch.   Work 4 dc to take you to the bottom loop of the heart.  3dc into the bottom stitch of the heart, 4 dc, work 2dc, 3dc, 3dc into the next three stitches, 2 sl stitches and one final slip stitch into the centre of the heart.

third round – 2 slip stitches then 2dc into the next five stitches (around the top of the left side of the heart) 7 dc, 3dc into the bottom stitch of the heart, 7dc, 2dc into the next five stitches, 2 slip stitches and finish off to complete the heart.

US terms

Make a magic loop, chain 3 and working into the magic loop, 3TRC, 3DC, chain 1, 1TRC, chain 1, 3DC, 3TRC, chain 2, slip stitch into magic loop and pull the thread to close the centre of the heart.

second round – 2 sl stitch into the gap behind the three chain from the first round.  3SC into the next stitch (top of the left side of the heart), 3 SC into the next stitch and 2SC into the following stitch.   Work 4SC to take you to the bottom loop of the heart.  3SC into the bottom stitch of the heart, 4SC, work 2SC, 3SC, 3SC into the next three stitches, 2 sl stitches and one final slip stitch into the centre of the heart.

third round – 2 slip stitches then 2SC into the next five stitches (around the top of the left side of the heart) 7 SC, 3SC into the bottom stitch of the heart, 7SC, 2SC into the next five stitches, 2 slip stitches and finish off to complete the heart.

Hope you like this pattern.  Happy crocheting!

Annie 🙂

Filed Under: Craft projects, Crochet patterns Tagged With: commuter crochet, crochet, crochet heart, Free pattern, heart, hearts, uk and us instructions, uk crochet heart, us crochet heart

27 May 2018

June 2, 2018 by A_Sticky_tape_and_string_girl Leave a Comment

Hello 🙂

Welcome to my second update.   I hope you have had a happy, productive week?   I have been busy finishing the little bags I started last week but Sunday did not start well.    I left my crochet in a bag in our living room over night, and this is what I found the following morning….

and this is the likely culprit!    We have three dogs, a mum and two pups.   The pups are just over a year old and still love to chew things!   The puppy in this pic is called Poppy and she is the worst for chewing things.   So far she has demolished various bags and shoes, including some expensive boots and the only pair of pricey sunglasses I have ever bought!    Our fault for leaving things in her reach I suppose.

Luckily for me my Mum loves to untangle yarn so I gave the tangled mess to her and now have a nice tidy ball again.     I finished the bags and basic bag pattern and put a blog post out about that.   bag pattern post.

I also made a few discs and hearts in the process – the discs were the bottom of the bags but I like the look of them on their own.   I might work them into a project of some kind but haven’t quite figured out what yet.    The hearts started out as motifs for the bags, from a basic pattern I found online.  I wasn’t very happy with the pattern so I adapted that to make a few medium and larger ones.  The larger ones are a bit more stable, I am very pleased with the pattern I created.

I am going to experiment with a heavier weight of yarn next.    I think these would make lovely table decorations for a wedding, baby shower or birthday.   I will write up the heart pattern so I can share it with you in a future post.

I made some in brighter colours too in Drops Paris yarn that I am worked sample squares in for a blanket.    I might try to work these hearts into the blanket design!

The other project I have been working on since I spoke to you last, is some bunting for a family birthday.    I put up a separate post on this as I managed to complete the work.   The bunting looks lovely and will be able to be reused unlike the tacky plastic stuff I normally buy.    I have been considering a design for crochet balloons but I am not sure I have that sorted yet 🙂   My post on the bunting includes the basic flag pattern and explains how I joined them into a garland.    You can read that post here  Bunting Pattern post

Last week I promised an update on my blog goals.    I put quite a bit of thought into this but I haven’t managed to create the bullet journal pages yet.  I am trying to keep it simple as I do find that keeping a bullet journal takes a lot of time.    The time I spend is lovely relaxing mindful time but I am not sure I have enough time available to devote so much of it to keeping a track of progress.   I will try to get these trackers done for next week’s update.   I do worry that I would make more progress if I didn’t spend so long tracking it 🙂

Status today – I have 544 Pinterest followers so I put on 22 this week.   Nothing exciting has happened with AdSense so I am still on 16p 🙂   I am getting a few page views, around 80 per week on average but no clicks.     I need to do some research on how to improve that if I want to achieve my goal of being able to spend more time on my crafting and blogging.   Maybe the adverts are not relevant enough.

I haven’t read up on mailing lists yet but mean to do that this weekend so watch this space on that one.   I haven’t listed anything new on Etsy either – I plan to write up the more complicated bag instructions along with some edged bunting and options for decoration then I will list both patterns.    I could list the bunting for sale but I want to use it at home – I will have to make some more!!

Finally, I was soooo thrilled to get a response to my first weekly update so this week I am planning to do a bit more research on my fellow crochet bloggers and leave a few comments on their posts, to see if I can make new connections and support people who are working on similar projects.   That’s all for now – more next week!

Happy crocheting!

Annie 🙂


Filed Under: craft blog, Craft projects Tagged With: bags, beginner blog, Birthday, bunting, commuter crochet, Craft, crochet, design, Free pattern, handmade, small bags, stash busting, wool eating puppies

Birthday bunting – free pattern

May 27, 2018 by A_Sticky_tape_and_string_girl Leave a Comment

I would like to share with you a free pattern for my birthday bunting.   We have a happy day coming up in our household.    Every year I buy trashy plastic decorations and would like to stop! I have seen lots of news articles about the impact of plastic on the environment. This made me wonder whether I could make some bunting that we could re-use and this is the result.    I am quite pleased with it 🙂

Firstly I made the basic flags.   Working in double knitting weight yarn. I used yarn from my stash. If you are buying new, I do recommend the Special DK by Stylecraft. This yarn is great value and comes in a wide range of colours. I will leave a search link below.   If you click on the link it will take you to the current offers Amazon have for this yarn. Please note any links in my posts may give me a small income at no additional cost to readers. You could make these even more sustainably by using recycled yarn. Yarn recycling is a fun hobby of mine and you can read about it, including methods and tips here.

Birthday bunting – free pattern starts here!

UK/(US) instructions – Basic flag pattern work as follows – using a 4mm hook and DK yarn

Chain 39 (note this is a chain of 37 with two for the turn)

Work one row in DC (US terms SC) starting with the third chain from the hook

Turn, chain two. Work one row in DC (US terms SC) starting in the top of the second DC on the row below.

Turn, chain three. Work one row in TR (US terms DC) starting in the top of the second DC on the row below.

Repeat – so that you are doing two rows of DC (US terms SC), followed by a row of TR (US terms DC). At the start of each row, reduce one stitch by missing the first stitch of the row and working into the second.

As you repeat this pattern you will find each time you work a row of TR (US terms SC) you will have 3 stitches fewer than you had on the last row of that type.   Eventually you will get to a row of trebles where you only have 2 stitches to work and at that point you can finish off the work.

Making up the Bunting

To make the top of the bunting I started with a chain of six and formed a loop.   I then worked 30 chain before working 37 DC (US terms SC) across the top of the first flag using DC (US terms SC).   Put in 10 chain between each flag taking care not to allow the chain to twist.   Carry on until you have included all the flags you need. At the end work 30 chain then six more chain. Slip stitch into the first of these last six to make a loop.

Finally, work 12 DC (US terms SC) into the loop formed by the six chain and then work DC (US terms SC) all along the bunting to the end where you need to work 12 DC (US terms SC) into the final loop and slip stitch to finish off.

If you wanted to make smaller bunting then simply start with a smaller number of stitches.

Decoration is optional depending on the occasion.   As this is for a birthday I wanted to include the lettering.    Initially I worked up the letters in free form crochet but I wasn’t very happy with the result so I used felt instead.   This also made it a bit quicker to make.   I edged the felt letters with blanket stitch in the same colour way as a contrast.    Here is a close up of the ‘Happy’ 🙂

And on that note I will bring the post to a close – please let me know how you like the bunting.   I will be putting it up on my Etsy page which you can see here. Happy crocheting!

April 2020 update – I am reusing this pattern to make rainbow bunting to show support for the medical profession and all carers as the world fights Covid-19. Pattern to follow.

Annie 🙂

Filed Under: Craft projects, Crochet patterns Tagged With: Birthday, bunting, commuter crochet, Craft, crochet, design, Free pattern, handmade, small crafts, stash busting

Stripes Scarf – Blue

May 6, 2018 by A_Sticky_tape_and_string_girl 2 Comments

Here is a blue version of my Stash Buster Scarf.   I wrote up the pattern that I created when I made the pink/purple version and realised that I didn’t have yarn quantities so I made it up again in blue so I could get the weight of yarn required.    I also took photos during the making process so that I could add them to the pattern.

The pattern uses five colours and I happened to have four blue shades in my stash so went with those plus white to make five colours for this design.

I wanted to be able to explain in pictures the way that I finished the scarf off without needing to weave in ends.   I also wanted to show how I added in additional yarn to bulk out the fringing.    The finished pattern is up on my Etsy store which you can reach on the following link.

Stash Buster Scarf Pattern

This pattern is very easy so would suit a beginner and can be made up in whatever colours you choose.   Sounds dreadful to be thinking about Christmas as we are in May currently but I think this would make a lovely handmade gift and you can pick a colourway to suit the person it is for.

I have listed the pattern on Etsy but you can grab it here for free on this download. Stripes scarf (18497 downloads )
Happy Crocheting!

Annie 🙂


Filed Under: Craft projects, Crochet patterns Tagged With: Craft, crochet, design, Etsy, handmade, scarf, scarves, stash busting, yarn

Spring blanket

May 1, 2018 by A_Sticky_tape_and_string_girl Leave a Comment

The sun has come out in the UK.  It is April and we have had a lovely few days of really warm weather.  I have been working on a blanket in spring colours and was looking for opportunities to work on this on my commute so I have incorporated some pretty flowers and blocks into the design that can be worked up separately and added to the larger work at home 🙂

Here are the colours I am using and you can see I have made a start with the first few rows in basic stitches.   I am trying Stylecraft DK for the first time as I have seen so many crochet bloggers recommending it.   It is certainly good value and has been very nice to work with so far.   There is a fantastic range of colours to inspire and I am already thinking about the next project and the next…. although that does not help me reduce my yarn stash!! (shhhh!!).

The flowers in the picture below will form a row across the blanket and I plan rows of pale pink and white to follow.   These flowers are perfect for working on my commute!!   I have been working up the centres one day and then adding petals the next so that I only ever have to carry one ball of yarn.

The main blanket is already quite large as I am aiming at double bed size.   It can only really be worked on at home now but it is growing quickly.  I love these colours they are making me really happy as I work 🙂

I am documenting the pattern as I go as I plan to list the blanket and pattern in my Etsy shop.  I will post an update when I get to the next stage and I am working up blocks on the commute.   One day I will get organised and issue these patterns as a CAL but I think I need a few more blog readers before I try that.   I wish I could spend more time on my crafting and blogging but I don’t suppose I am alone in that.  Too many ideas and too little time.   Ah well….

Happy crocheting!

Annie 🙂


Filed Under: craft blog, Craft projects Tagged With: blankets, commuter crochet, commuting, Craft, crochet, design, handmade, small crafts

  • « Go to Previous Page
  • Page 1
  • Interim pages omitted …
  • Page 4
  • Page 5
  • Page 6
  • Page 7
  • Page 8
  • Go to Next Page »

Footer

Newsletter

Copyright © 2026 · Genesis Sample on Genesis Framework · WordPress · Log in