• Skip to primary navigation
  • Skip to main content
  • Skip to footer

Stickytapeandstring

Created with WordPress managed by 1&1

  • Craft projects
    • craft business tips
    • craft blog
    • Crochet patterns
    • Upcycling
    • craft with kids
  • Blogging
    • New to blogging
    • Blog diary
  • Bullet Journal
  • About me
  • Welcome!!

A_Sticky_tape_and_string_girl

Crochet blog – update #5

June 24, 2018 by A_Sticky_tape_and_string_girl Leave a Comment

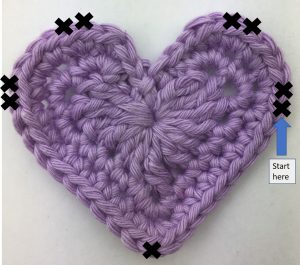
Hello and welcome to my fifth weekly update!

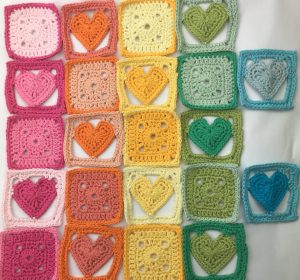
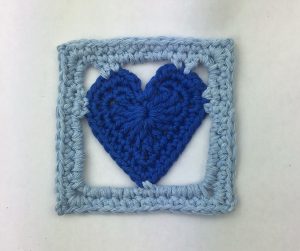
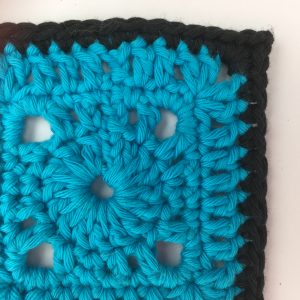
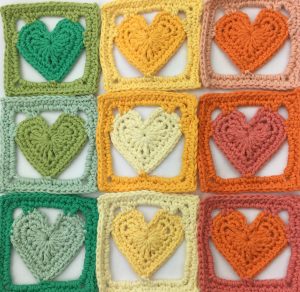
This week has been all about getting my heart and spot squares finished.    I have completed all the blocks for four of the colours.   Sewing in the ends has been a long long job!   I laid out the finished blocks  in the order I want them to sit in the finished piece and I am preparing to start joining them up.   I plan to join them using the mid shade in each colour way but I might change my mind on that after testing a few styles.   Here is the layout I am working on.


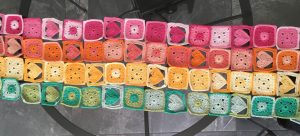
The picture shows almost all the squares in a row and there are are another eight rows to complete!  I was given a single ball of every colour of Paris Drops cotton yarn for Christmas and this is the project I came up with for that yarn.   The pattern would be great for using up oddments though and the design would look very different with random colours instead of these single colour stripes.   I am planning to make it again mixing all the colours up as an experiment 🙂

Yarn Review –  Drops Paris – this is a strong cotton yarn that works up using a 5mm hook/needles.    The yarn comes in a wide range of colours – 47 available at the time of writing.  Some of the colours say that they are made from recycled denim and those tend to be more harsh in texture.   In general the yarn is relatively soft for cotton.   Drops Paris is made up of many thin strands and does have a tendency to split.  This means you have to watch carefully as you work but if you do find it splitting it is easy to pull back out and correct.    One really big plus for me is that I have hardly found any breaks/knots in the yarn.   It is very reasonably priced – I am picking up odd additional balls as required for around £1 per 50g ball.

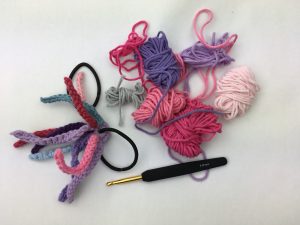
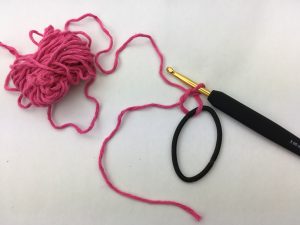
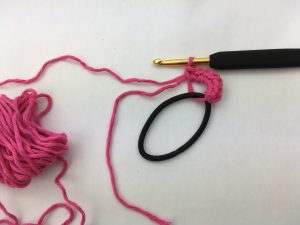
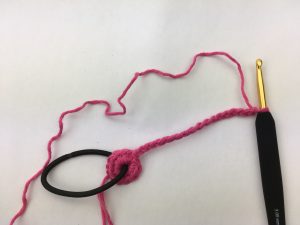
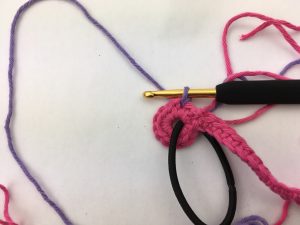
Stash buster project – Even though this blanket project is a stash buster itself, using small bits of yarn, I am still finding that I have oddments left over.   As a break from sewing in the ends on all these blocks I came up with a use for those oddments.    This is a hair accessory I made.

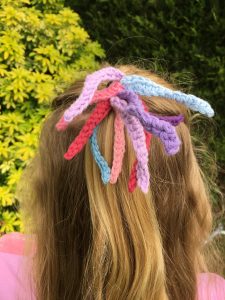
I have put up a separate post  – hair accessory instructions in case you want to have a go at this.    It is soooo quick and I am really pleased with the results.    I am using fairly thick cotton per the review above, but if made using lighter, softer acrylic yarn the strands form lovely spirals which you can mix and match with the straighter ribbons.

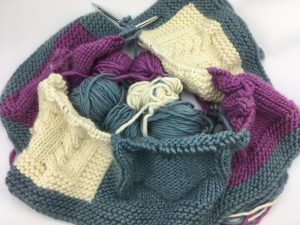
In other (non-crochet) news, I have been working on two knitted blanket patterns which I will be sharing next week.   One of them is a chunky, soft and cosy blanket made with some lovely 100% merino wool (shown below) that I picked up at a craft show.   The other is a much lighter baby blanket with stripes and hearts.   I am looking to back the baby blanket with fleece and put some crochet edging round it but at this stage the blocks are waiting to be sewn together.

I think that is all I have this week – back to sewing in ends and sewing up blocks for me!   Happy crocheting!

Annie 🙂

Filed Under: craft blog, Craft projects Tagged With: beginner blog, blocks, commuter crochet, cotton, Craft, crochet blog, design, small crafts, stash busting, yarn

Hair accessory

June 24, 2018 by A_Sticky_tape_and_string_girl Leave a Comment

Hello!    I wanted to share this free pattern for a hair accessory with you.    Most of my making time at the moment is going into a large blanket made of smaller squares.   I am spending all my time making these squares and finishing off the ends.    The work is a stash buster in its own right as it uses small quantities of yarn to make each square.   However, I am still finding myself with some very small oddments and it hurts me to thrown those away so I have come up with this design to use even the smallest pieces of left over yarn!    Here is the finished result.


Instructions – Hair Accessory.

To make this you need small oddments of yarn, an elastic hair band/tie and the size of crochet hook appropriate to your yarn.   In my case I am using left over Drops Paris yarn which takes a size 5mm hook.

Start by making a magic loop that goes through the middle of the hair band.   I found this a bit of a mind bend to start with!   I am including a picture below so that you can lay your work down and copy mine if that helps!

Work 12 DC (SC US) into the magic loop.    You might need to vary this according to the weight of your yarn.   It doesn’t really matter how many stitches you put into the loop as long as you can pull it tight to circle the hair band – see below.

Without breaking the yarn work a chain to the length you require.   This will form one of the ‘ribbons’ in the final item.   If you are using light/acrylic yarn then the ribbon will spiral so you may need a longer chain.   In the yarn I am using the ribbons do not curl much and I used a chain of between 12 and 16 in the finished piece pictured.

When you have the chain to the length you require work back along the chain either using slip stitches or DC (US terms SC).   The SC will give the effect of a cord, DC (SC US) will give a thicker strip.    Finish off the strip with a slip stitch into the outer edge of the DCs in the magic loop.  This will reinforce the join between the ring and the strips and make the item more robust.

Join in other colours to the DC’s in the magic ring and repeat the steps above to add more strands to the accessory.   Keep these close together on one side of the ring so that the other side can sit against the wearers head without making it uncomfortable.

Finish the piece by sewing in the ends but this need not take long as you can run the loose ends down the length of the ribbons very quickly!    And that is it – you can play with colours – match them to other garments or use any random oddments in your stash!    These could look lovely on flower girls if they were worked all in cream/white or could be made to match the colours of flowers or bridesmaids dresses.

Hope you have a go at this and enjoy the results as much as I did.    I think it is a really fun way to use up tiny scraps of yarn and a lovely break from big projects.  Happy crocheting!

Annie 🙂

Filed Under: Craft projects, Crochet patterns, Uncategorized Tagged With: commuter crochet, Craft, crochet, design, Free pattern, girls, hair, hair accessory, handmade, kids, stash busting, yarn

Crochet blog – update#4

June 16, 2018 by A_Sticky_tape_and_string_girl Leave a Comment

Hello 🙂

Welcome to my fourth weekly update.   This update is slightly different as I have decided to split out the crochet content from the blog progress updates.   If you are interested in the blog progress then you can read about them here.

Soooo – crochet!!   This week I have been working on my Shades of the Rainbow blanket – do you like that name?   I am not sure yet.   I might call it Shades of the Heart because I have worked up my heart pattern into a square for inclusion in this blanket.   Here are a few of them laid out.   I have about five more sets of three colours to complete and about four more where I have completed the crochet but have to tie in all the ends yet *sigh*.   Here is a picture of some of the finished squares.

I put up a blog post giving the free pattern for the Heart Square – just follow the link if you would like to give it a go.


I am working on another type of square to include in the blanket – a spot.   I wanted to include more solid squares as I am worried that the heart squares might not be very stable given how much space there is around the heart.   Here are a few of the ‘spot squares’.   I worked these up from my sample square pattern but changed the colour of the yarn for the first round and last round.

These squares have all been brilliant to work on my commute – I only need to take a couple of small balls of yarn and my hook.   The yarn is Drops Paris which is incredibly good value at c £1 per ball for pure cotton.   The yarn splits a little so needs care to work with but it has been very good quality for the price with very few of the hated knots and breaks!

The other project I have worked on at home this week is my Spring Flowers Blanket.  I started this in Spring, hence the name but I don’t think I will be finishing it until next Spring at this rate of progress.   The problem I have with it is that I am working across the full width of a blanket so I cannot really take it out of the house as it is already getting a bit big to carry around!

This is the latest progress with the flowers joined to the body of the work and the next section started.    I will work up another row of flowers on my commute when I have completed all these hearts and spot blocks (see above!).

That is all from me for this week… happy crocheting!

Annie 🙂

Filed Under: craft blog, Craft projects Tagged With: beginner blog, blankets, commuter crochet, crochet, crochet blog, Free pattern, squares, stash busting

blog progress #4

June 16, 2018 by A_Sticky_tape_and_string_girl Leave a Comment

Hello and welcome to my fourth weekly update.   This week is different for two reasons.   Firstly I realised that this is an anniversary of sorts – I set up my blog around a year ago.   Secondly I have decided to split the blog progress updates from the crochet blog because I am not sure whether all readers would want to see both.

The realisation that I have been working at this in my spare time for a little over a year now surprised me.   It feels like I have only really been working on this for a couple of months.   I didn’t put much time into it at first and I didn’t set myself any goals when I started.   Big mistake.    Everything feels a lot more focussed now and in the last two months I have started to make real progress.

My top tips from a year of blogging.

1.  GET STARTED

I spent so long dreaming about starting a blog; talking about starting a blog; reading the work of other people who were starting a blog….  you get the idea.   I spent so long doing everything BUT start this blog.   It can all feel a bit daunting at first but it is like all large tasks, you make a start and chip away at it and before you know it you have a blog!   One thing is certain, if you don’t start, you will never have a blog.   The first step I recommend is get yourself a domain.   I use 1&1.  Many people recommend Blue Host.   If you want real ownership of your content and flexibility to monetise your blog one day it is better to host it on your own domain.   The link below will take you to 1&1 where you can have fun checking out potential names for your blog.   1&1 have very low pricing for starter packages.   At the time of writing these start at £0.99 per month for the first year, £4.99 per month thereafter.  You probably won’t need more than a starter package – if you do that would mean your blog had really taken off and would be a nice problem to have!!   Don’t let anything hold you back – make a start today and get your blog off the ground.

2.  WORDPRESS

WordPress is a really easy way to get your blog up and running and it is free.    1&1 offer a download which takes minutes to load.   I paid for a ‘theme’ when I started because I read that some of the free themes do not allow you to set up advertising.  Here is a link to one of my first posts from last year  where I went into more detail on setting up your blog and included a link to the free tutorials that helped me get started.   The more you work with WordPress the easier it gets so again my recommendation is JUST GET STARTED!!

3.  MONETISE straight away but don’t stress if nothing much happens!

I waited until the last few months to get started with monetising my blog but there is no reason to wait.   Many of the affiliate schemes out there and advertising plans accept newbies.   I am a member of the 1&1 affiliate programme as you can see from the link above.   This has not brought me any income so far but it could do – at no additional cost to my readers.

I also use Google AdSense which is great fun if only for the trackers that show how many page views and clicks your site has gained.   See my status report at the bottom of this post.

My final recommendation is to join Shareasale through which you can apply for links for products and services you want to recommend.   There is no charge to you for this. When readers of your blog click on these links you will earn a small income at no additional cost to your reader – everybody wins!   Join shareasale.com, Earn Cash!

4.  USE SOCIAL MEDIA

Use social media to build up a following which will then drive traffic to your blog.   Whatever your niche build up a profile in that subject area.   This year I have used Pinterest mainly.   There is a huge amount of help and advice out there on Pinterest and facebook in particular where you can also link up with other bloggers who help and share in your progress.   I have found Pinterest to be a quick way to build a following.  Facebook seems to require more work and I haven’t really used very much as yet.    Twitter and Instagram also help drive traffic  but again need more time spending on them.   These are on my list for this coming year.

5.  PUT OUT CONTENT REGULARLY

I have had the most success when I have put out content on my blog weekly or bi weekly.   With Pinterest I have gained the most followers when I have pinned around 20 times per day.    My pins are partly my own content but also quality content that I have found on Pinterest.   Pinning takes time and to be effective needs to be spaced through the week.

I use Tailwind to schedule my own pins and pins from my Tailwind tribes.   This allows me to put in a couple of  hours on my blog at the weekend and benefit all through the week when I am busy with my day job!  Using Tailwind has enabled me to build my Pinterest following quickly.

Tailwind tribes are genuis – they allow you to find like minded bloggers and make connections that give you the chance to promote their work whilst showing them your posts and gaining help from them.

I am a member of the Tailwind affiliate programme but have not yet earned any income.   Tailwind is free to use at entry level but I have now upgraded to a paid service.   I simply couldn’t run my blog without Tailwind as I am so pushed for time during the week.

The other recommendations I have read up on but cannot claim to have experience of yet are as follows:

  • Build a mailing list – I just set mine up so will report when I know more
  • Guest post on other blogs – I received my first invitation to do this and I plan to take that up when I have some really good content to share
  • Build your network – comment on other blogs and follow like minded bloggers.   This is very much in my plan for the coming year.There is so much you can do when you have a blog, so many strategies to try.   It doesn’t have to take up all your time though.   To repeat myself (again) – my heartfelt recommendation is to give it a go – just get started.   I have had so much fun doing this this year and I am looking forward to a successful second year.


    Finally – here is my status report.   Showing progress in the last seven days:

    • Pinterest followers – 602  (up 27 this week)
    • AdSense income to date – 40p   (up 8p this week)
    • Subscribers – 1 (me – it was a test)
    • Etsy listings – 10
    • Etsy sales – 0
    • Page views last seven days – 61 (up 27 this week)

My focus this last week was on Pinterest board descriptions and I have increased my following more rapidly so it could be that that has been paying off.    Next week I plan to work on my group board applications.    That’s all from me.  More next week.

Happy blogging!

Annie 🙂

Filed Under: Blog diary, Blogging Tagged With: beginner blog, blog progress, blog set up, blogging tools, tips

Heart square

June 16, 2018 by A_Sticky_tape_and_string_girl Leave a Comment

Hello, in this post I am sharing a free pattern for a heart in a square with you.     A few weeks ago I designed a crochet heart and shared the pattern as a stash busting project.   I wanted to include my stash busting hearts in my Shades of the Rainbow blanket so I have designed a pattern to put the hearts into a square of the same size as my sample squares.

Here is a link to the heart pattern.   This pattern starts with a completed heart.   The heart you made should look like this.   I have also included the heart pattern again at the bottom of this post.

The picture above shows the start point for this pattern and the points where the outside border joins the heart are indicated with an X.

Heart in a Square pattern – UK version (US version below)

First round – slip stitch into the side of the heart in the stitch indicated in the picture above.  CH2, DC into next stitch, CH5, miss three stitches, TR into the next stitch (at the top right of the heart), DC into next stitch, CH5, DC into stitch at the top of the left side of the heart, TR, CH5, miss three stitches, 2DC, CH12, DC into the bottom stitch of the heart, CH12 and slip stitch to the second of the chains that started the round to join to your start point.

Second round – CH2, DC, (2DC, CH2, DC) into the corner, 2DC at the top right hand side of the heart, 5 DC across the centre/top of the heart, 2DC into the top left hand side of the heart, (DC,2CH,2DC) into the left hand corner, 2DC, (7DC, 2CH,5DC) into the bottom left corner, DC into the stitch at the bottom of the heart, (5DC,2CH,7DC) into the bottom right corner and slip stitch to the second of the chains that started the round to join to your start point.

Third round – CH2, DC all round working 2DC,2CH,2DC into the corner chains.

You should end up with a square that looks like this 🙂

Heart in a Square pattern – US version

First round – slip stitch into the side of the heart in the stitch indicated in the picture above.  CH2, SC into next stitch, CH5, miss three stitches, DC into the next stitch (at the top right of the heart), SC into next stitch, CH5, SC into stitch at the top of the left side of the heart, DC, CH5, miss three stitches, 2SC, CH12, SC into the bottom stitch of the heart, CH12 and slip stitch to the second of the chains that started the round to join to your start point.

Second round – CH2, SC, (2SC, CH2, SC) into the corner, 2SC at the top right hand side of the heart, 5 SC across the centre/top of the heart, 2SC into the top left hand side of the heart, (SC,2CH,2SC) into the left hand corner, 2SC, (7SC, 2CH,5SC) into the bottom left corner, SC into the stitch at the bottom of the heart, (5SC,2CH,7SC) into the bottom right corner and slip stitch to the second of the chains that started the round to join to your start point.

Third round – CH2, SC all round working 2SC,2CH,2SC into the corner chains.

In case there are issues with the heart link or just in case you would like this pattern all in one place – here is the heart pattern:

Heart Pattern

UK terms

Make a magic loop, chain 3 and working into the magic loop, 3 dtr, 3tr, chain 1, 1dtr, chain 1, 3tr, 3dtr, chain 2, slip stitch into magic loop and pull the thread to close the centre of the heart.

second round – 2 sl stitch into the gap behind the three chain from the first round.  3dc into the next stitch (top of the left side of the heart), 3 dc into the next stitch and 2 dc into the following stitch.   Work 4 dc to take you to the bottom loop of the heart.  3dc into the bottom stitch of the heart, 4 dc, work 2dc, 3dc, 3dc into the next three stitches, 2 sl stitches and one final slip stitch into the centre of the heart.

third round – 2 slip stitches then 2dc into the next five stitches (around the top of the left side of the heart) 7 dc, 3dc into the bottom stitch of the heart, 7dc, 2dc into the next five stitches, 2 slip stitches and finish off to complete the heart.

US terms

Make a magic loop, chain 3 and working into the magic loop, 3TRC, 3DC, chain 1, 1TRC, chain 1, 3DC, 3TRC, chain 2, slip stitch into magic loop and pull the thread to close the centre of the heart.

second round – 2 sl stitch into the gap behind the three chain from the first round.  3SC into the next stitch (top of the left side of the heart), 3 SC into the next stitch and 2SC into the following stitch.   Work 4SC to take you to the bottom loop of the heart.  3SC into the bottom stitch of the heart, 4SC, work 2SC, 3SC, 3SC into the next three stitches, 2 sl stitches and one final slip stitch into the centre of the heart.

third round – 2 slip stitches then 2SC into the next five stitches (around the top of the left side of the heart) 7 SC, 3SC into the bottom stitch of the heart, 7SC, 2SC into the next five stitches, 2 slip stitches and finish off to complete the heart.


That’s all for now.    I will be sharing my completed blanket in a few weeks – just a few more squares to go – and a lot of ends to tie in!!

Happy crocheting!

Annie 🙂

Filed Under: Craft projects, Crochet patterns Tagged With: block, commuter crochet, Craft, crochet, design, Free pattern, handmade, small crafts, squares, stash busting

2 June 2018

June 10, 2018 by A_Sticky_tape_and_string_girl Leave a Comment

Hello 🙂  Welcome to the third weekly update on my journey to being a full time craft blogger and designer.    Ooooh that sounds exciting when written down….  but to put it into perspective, this journey could take me the remainder of my working life and I might not actually be a full time craft blogger until I retire from paid employment in my 70’s!

This week I have been working on defining my goals and developing a tracker so I can measure progress.   Some of my goals feel like an awfully big stretch from where I am now but all the advice out there says to aim high!   The goals needed to be broken down into smaller targets for the next six months.   Here they are from my bullet journal…..   I will be adding to these targets as I work out what is most important and what works.

One of the top tips for beginner bloggers is to set up and manage your own mailing list.   I learnt quite a lot this week whilst researching  and setting up my mailing list.  If you are reading this you might have been invited to join mine!    I hope you will join 🙂  I will write a separate post on this in a couple of weeks when I can comment on how well it is working for me.

Focussing on the technical side of my blog this week I have also been researching hints and tips for bloggers on Pinterest.   There seem to be so many blogs out there about blogging and many of them are promoting courses that claim to enable bloggers to turn their hobby into full time income.   The courses are expensive!!   I am not against investing in my blog.   I have spent a little already on getting set up with my own website using 1&1  there is a link to 1&1 below (note this is an affiliate link which could give me a little income at no increased cost to you).   1&1 have several low cost entry plans where you can set up and really own your blog from the start giving more flexibility and protection for your work.   Many of the plans come with free domain names and it is good fun checking out which names are available – checking costs nothing 🙂

1&1 Ionos

At the moment, I believe that there is so much more I can learn from reading and researching without spending money on courses.   I have a long list of things to work on and I will share with you anything that makes a big difference.    The top tips I will be working on this week are as follows:

  • Improve board descriptions on Pinterest – include key words
  • Apply to join group boards – although this is getting a mixed press currently
  • Declutter my blog

On the creative side this week I have merged two projects!!   My sample blanket that was stalled because I couldn’t come up with a design I really liked, and the heart patterns from last week.   I have made a pattern for the heart within a square and it is the same size as the sample square pattern I produced earlier this year.   Here is a link to the free pattern for the sample square.   I will be writing up the pattern for the heart square this week so I can share it in next week’s update.

I have worked up a few heart squares in the Drops Paris – 100% cotton yarn and here they are laid out in the start of the design I plan to complete.   This is a great stash busting project.   The other really good thing about this project is that it is perfect for working up on the train!   I have worked out that I am going to need more yarn though…. not a help to my stash busting efforts.    I have a room full of yarn and seem to keep needing to buy more!! 🙂

I picked up a tip from Kat over at KrazyKabbage on the best conditions to photograph large projects outside and I have managed to take this photo of my big Sunshine Flower blanket.   This is the best photo I have taken so far – very happy with it.

In the evenings this week I worked a few more sections of my Spring Flower blanket.   I am really pleased with the way this is coming on and I am documenting the pattern at every stage so I will have another item to list on Etsy when I am done.  I don’t have a photo this week but will share again next week.

I will probably list the blanket on Etsy too but when I cost the blankets in terms of the time they take to make, plus materials, the price I need to charge makes them unaffordable.   I am listing them with little hope of a sale but at least they show the patterns.

Finally a weekly status report.  I am hugely excited by the leap in my advertising income which has almost doubled…… to 31p  🙂

  • Pinterest followers – 556
  • AdSense income to date – 31p
  • Subscribers – 1 (me – it was a test)
  • Etsy listings – 10
  • Etsy sales – 0
  • Page views last seven days – 34

I am starting to track page views – apparently this is key to success.    Stickytapeandstring.co.uk is currently running at around 140 page views per month.   Some bloggers quote 1000 per day as being the level you need to be taken seriously…. As I say – this is not going to be a short journey!    More next week….

happy crocheting and happy blogging,

Annie 🙂

Filed Under: Blog diary, Blogging Tagged With: beginner blog, blankets, blocks, commuter crochet, crochet, design, handmade, ideas, projects, stash busting

  • « Go to Previous Page
  • Page 1
  • Interim pages omitted …
  • Page 8
  • Page 9
  • Page 10
  • Page 11
  • Page 12
  • Interim pages omitted …
  • Page 14
  • Go to Next Page »

Footer

Newsletter

Copyright © 2026 · Genesis Sample on Genesis Framework · WordPress · Log in