• Skip to primary navigation
  • Skip to main content
  • Skip to footer

Stickytapeandstring

Created with WordPress managed by 1&1

  • Craft projects
    • craft business tips
    • craft blog
    • Crochet patterns
    • Upcycling
    • craft with kids
  • Blogging
    • New to blogging
    • Blog diary
  • Bullet Journal
  • About me
  • Welcome!!

A_Sticky_tape_and_string_girl

Crochet blog – update #7

July 16, 2018 by A_Sticky_tape_and_string_girl Leave a Comment

Hello and welcome to my 7th update.    I am still aiming to do these weekly but my week was crazy busy last week and I didn’t make enough progress to tell you about!

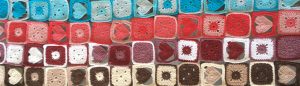
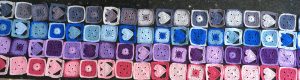
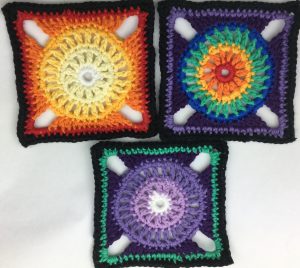
Over the last two weeks I managed to complete the squares for my hearts and spots blanket.  Here are the last four rows.    These are not laid out in the order I plan to put them together here but you get the idea.

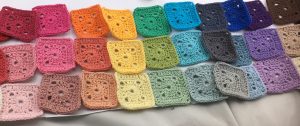
The original colour layout looked like this.    I will be joining the blocks in this order more or less.

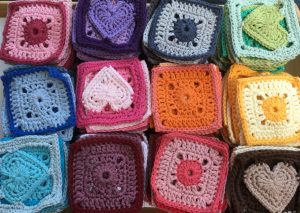
The heart squares are less stable than the spot and solid squares so rather than make it random I am rotating the three designs which means that a heart square will always be surrounded by solid/spot squares.  Here are the finished blocks in their colour piles!

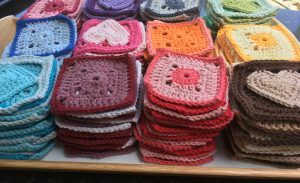
I have been working on joining methods.    For my sunshine flower blanket I wanted to make the joins as invisible as possible.    This hearts and spots blanket will make a feature of the joins.    I am using the mid colour from each of the sets to join the blocks in each row.    For the joins between rows I haven’t decided what to use yet.    I might carry on with the mid colour of the previous row or might use the bold colours.

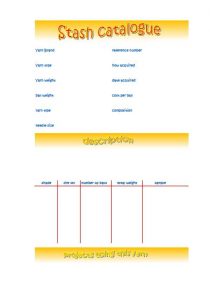
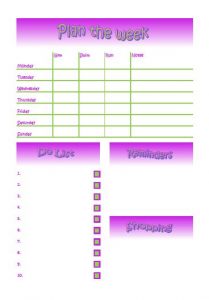
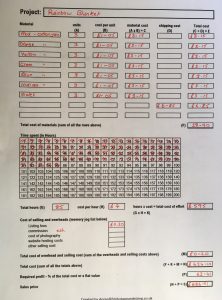
Away from this blanket I have been trying to get organised.    I recently published a couple of posts on daily and weekly planning with free printable planner downloads.  I have also been working on a stash catalogue which I will share in a separate post but this is what it looks like.   Here is the file as a free download.   The file is A5 size so you might need to resize it if you would like a different format.    If you have any problems with this please let me know and I will resize the file for you!   stash catalogue (19536 downloads )

I have quite a large stash of yarn (!) and much as I try to make use of it before buying more yarn, it doesn’t seem to reduce any!   I hope that having it catalogued and available to browse through will improve my ability to create ideas to use it all.   One thing I have found is that as I go through the backs of cupboards and packing boxes to look at all my yarn, I am falling in love with it all over again.    I have found some yarns I didn’t know I had!    I read an article on yarn stashing and I know I am not the worst for this.   I do not have any yarn deliberately hidden from my family.    I loved one story I read, of a knitter who had removed a bath panel to create a new hiding place for an extreme stash ๐Ÿ™‚

That’s all from me this week.   I will go back to joining squares and cataloguing my stash.    I hope to be able to edge the hearts and spots blanket next weekend and to share the final pattern.   Happy crocheting!

Annie ๐Ÿ™‚

Filed Under: craft blog, Craft projects Tagged With: blanket, blog, Craft, crochet, design, productivity, stash, stash catalogue, yarn

Simple weekly planner

July 16, 2018 by A_Sticky_tape_and_string_girl Leave a Comment

Hello ๐Ÿ™‚    This is a quick post to show you my latest planning tool.      Apparently we are all more likely to stick to plans we write down so this is my way of making my plans for the week sticky!

Planning the week on a Sunday evening works well for me.    It only takes 10 minutes because the bones of the planner are already printed.     I am trying to get fitter so the activities I am tracking are gym/swim/run.    These are printed on the first download below but the second has blank activities so you can fill in with whatever you need your week to look like.

The Do List has tick boxes so you can mark the actions complete.   I use a little arrow pointing to the right when I haven’t completed something but plan to carry it forward to the following week…..   I do quite a lot of that!

I have a more detailed planner for each day which I use at the weekends but for the week this one works for me!   This link takes you to my daily planner post which also has a free download.

This planner is very much based on what I use in my own daily life.   I would love to get some feedback from you.   Feedback would help me adapt my designs to what you would like to track each week.   What would you find helpful in a planner or action tracker?

That’s all from me.    I did say it would be short.    Here are the two downloads.

simple weekly planner (10473 downloads ) , simple weekly planner - blank (11243 downloads )

happy planning!

Annie ๐Ÿ™‚

Filed Under: Bullet Journal Tagged With: bullet journal, daily planner, do list, free download, planner, tracker

Daily planner

July 15, 2018 by A_Sticky_tape_and_string_girl Leave a Comment

Bullet journals are amazing.    You can spend hours drawing up the pages and making it as neat and pretty as possible.    However, there are two problems with that….  

Firstly, we don’t all have hours to spend on things like this!   Secondly, if you are not the most artistic nor the neatest person the finished results can be quite disappointing when compared to some of the beautiful pages you see online.

Some pages in a bullet journal are created once and last for months but some need to be set up monthly, weekly or even daily.    This can be very time consuming!   I often find I am recreating the same page over and over with only minor tweaks.   

I realise that in part, that is the point.    The mindful practice of keeping the journal has its own benefits.   I am sure that that is true, it is quite relaxing sitting with the coloured pens designing pages and thinking about layouts.   I would just rather be doing a little less of it and still have the pretty trackers and organisation.  Rather than create each journal page and tracker from scratch having the most commonly used ones as printed sheets saves lots of set up time.

How many days do you start with an enormous do list only to end the day with most of the list untouched and a feeling of failure?   Could it be that you simply didn’t have the time available to complete all your planned tasks.   If so you were bound to fail before you started!

The picture below shows a version of my daily planner.    This is one of my favourite pages as it tracks back to goals and forces you to take a view on the time available in your day and how you spend that time.     Let me take you through it…

  1.   Write your goals at the top of the page every day.    I know I just talked about this being a time saving download but writing your goals every day is important.    Each time you write them you are underlining them in your mind.    Think about your goals – are they really important to you?   Are they really what you want to achieve?   Good!   Now in the planner lets make sure you are getting to spend enough time on them.   Tip  I put a colour code beside each goal so that I can see where my time has gone quickly as I flip through completed pages.  Try to write your goals in a single short sentence.
  2. Work out how much time you have to spend on routine and how much time you have available for yourself.   There is a timeline giving a full 24 hours in 15 minute blocks.     If you are anything like me there are times when your day starts very early or ends very late and there are no hours of the day that are never seen!   When tracking self-care it is important to include the time you spend asleep or resting too.    Start by blocking out on the time available line anything that is fixed.     I include the time I plan to wake and go to bed here, work, fixed chores and appointments.  Tip – be realistic when working out the time it takes to complete fixed tasks.   Don’t assume that you stop one activity and instantly start another.  Be kind to yourself and allow breathing space.   It is better to plan to do less and achieve what you plan, than to plan to do huge amounts and fail.  This also applies to the next step where you list what you want or need to achieve.
  3. Write your do list of actions for the day.   Tip – you have already worked out how much or how little time you have available.   There is no benefit to setting yourself too big a mountain to climb in your action list.   Be realistic!   Try to start with the most pressing tasks or the things that are most important to you.    As you write your list consider whether each action is related to one of your goals.   There is a box to colour in or code with a number to tag it back to a goal.    Is the action a task that has to be completed, not related to your goals, just something that you need to do?    Is the action something that contributes to your self care?  Colour in the task box or self-care box beside the action.   Tip – this is where you start to see the balance of your day.   Are all your planned actions tasks?   Is there any self-care in the mix?
  4. Complete the timeline.   Fill in the Goals, Tasks and Self-care timelines.   Make sure you allow enough time for each action with a bit of breathing space in between.    Designate time for self-care.    During some parts of your day you might be able to work a bit of multi-tasking in!    Last time I read up on multi-tasking the general view was that it is a myth, nobody actually multi-tasks.   Our brains simply flip from one thing to another very quickly when we try.   The usual outcome is that we do neither task as well as we would have if we had focussed.   However, if you go for a run and allow your mind to wander over a problem you need to resolve…. in my book that would be working towards getting fit AND completing an action to resolve a problem!
  5. Select your key task.  To be positive, what is the one thing that would make your day feel successful if you accomplished it.    Put another way – what would you go to be worried about if you didn’t complete it!    Writing that task out again at the bottom of the list and selecting the slot that you are going to complete it in reinforces the plan.  TIP – highlight on the timeline the slot in which you will complete you key task.   Don’t look at my example for this – on the day I photographed my planner I didn’t complete the key task!   Hey…. nobody is perfect ๐Ÿ™‚
  6. Review.   The remaining boxes on the page are for review.    There are tick boxes (or colour in boxes) to show which actions were completed and whether any were carried forwards.    The section at the bottom allows me to record a couple of points on the day.    Something good that happened;  something I learned and something I did to help others.   I don’t have time to keep a diary but I find just three sentences gives me a bit of a record.
  7. Mood and energy tracker.  This is helpful as background to understand whether you are asking too much of yourself on certain days when you are possibly not feeling your best.    Learn from this and set your sights at an achievable level to allow yourself to succeed.   You are more likely to keep going and working towards your goals if you feel successful.   The mood tracker has a blank box for you to put in however you feel rather than being constrained by a pre-printed list!

There you have it.    The planner works best when you spend 10 minutes each evening reviewing your day and then working out what the following day looks like and what you plan to achieve.   Filing the completed sheets allows you to build up a journal without spending hours creating little boxes.   You can also mix and match, creating your own pages when you have time and relying on the printed pages when time is short.   Here is the free download.   Daily planner (8856 downloads ) .  Please let me know how it works for you.  Happy planning!

Annie ๐Ÿ™‚

Filed Under: Bullet Journal Tagged With: action list, daily planner, do list, free download, productivity

Crochet blog – update #6

July 1, 2018 by A_Sticky_tape_and_string_girl Leave a Comment

Hello and welcome to my sixth update!   This week I made more progress on my blanket project.   I realised I have been calling it different names as is has progressed.   It started life as my Shades of the Rainbow blanket but more recently I have been calling it Hearts and Spots!   Whatever name it ends up with I have to confess, I am ready to move on… I have never been great at finishing things but this blog acts as a conscience so I will get it done!

This photo shows four more completed rows of squares.   Only four more to go and I can start the making up.   I have already made the majority of the blocks for those last four rows but still need to fasten off the ends.

I started to look into pricing of this project, researching on Etsy and google for similar items and found a huge range of pricing.   Some of it was incredibly low and looks to cover the cost of materials at best.   This got me thinking!   I built myself a little spreadsheet to calculate the cost of producing the blanket.   I know what the yarn cost including shipping and I used the UK minimum wage to value my time. The blanket isn’t finished yet but when it is I will know what I should be charging. The spreadsheet has a section to record the number of hours worked.   I think I will use one for every project from now on.   I created it as a PDF and set up a FREE DOWNLOAD HERE.   Pricing basics (25898 downloads )   I wrote a longer post on pricing which you can read here – pricing basics.

As a break from my big project this week I designed this new block in the picture above.   I have made it up in a few colours with some of my left over scraps. I am very pleased with the way it turned out.   Here is a link to the FREE PATTERN. There are no complicated stitches so it should be suitable for beginners.   I have listed the instructions in both UK and US notation.   I haven’t decided on my next big project but I would quite like to make a blanket with this block.   I worked it in Drops Paris yarn on a 5mm hook and the finished blocks are about 14cms square.

The problem with these little side projects is that they hold up work on the main project.   I do tend to get a bit distracted by new things.   Confession time, I have three other side projects on the go.   I am working on a cushion design, a summer top and a shoulder bag design.   The good news is that I will be able to share those patterns with you soon I hope.

For now it is back to finishing of little Hearts and Spots squares.   I hope you have a good week. Happy crocheting!

Annie ๐Ÿ™‚

Filed Under: craft blog, Craft projects Tagged With: blankets, blocks, commuter crochet, cotton, Craft, crochet, design, Free pattern, handmade, squares, stash, stash busting

Wagon Wheel Block

July 1, 2018 by A_Sticky_tape_and_string_girl Leave a Comment

Hello!   This post contains a Free Pattern for my Wagon Wheel Block.   I wanted to create a block that would lend itself to Ombre projects and would also be suitable for stash busting as I have a lot of small remnants of yarn left over from my larger crochet blanket projects.

The pattern is made of simple stitches so should be suitable for beginners.    I made this up in Drops Paris which is 100% cotton in aran weight and works up on a 5mm hook.

Wagon Wheel Block – UK terms

Round 1.    Chain five and join to make a circle.

Round 2.    Chain 2, work 12 DC into the circle and join with a slip stitch to the second chain that started the round.

Round 3.     Chain 4,  (Tr, chain 1) repeat 11 times so that you have thirteen spokes to the wheel – (the chain that started the round plus 12 more spokes).   Slip stitch into the third chain of the 4 chains that started the round.

Round 4.     chain 2, DC into the space between the trebles on the previous round.   (2 DC into the space between trebles) repeat 11 times.   So you have two DC between each of the trebles on the previous row.   Join with a slip stitch to the second of the chains that started the round.

Round 5.     Chain 4, (Tr, chain 1) repeat 24 times so that you have 26 spokes to the wheel – (the chain that started the round plus 25 more spokes).   Slip stitch into the third chain of the 4 chains that started the round.

Round 6.     Chain 2, DC into the space between the trebles on the previous round.   (2 DC into the space between trebles) repeat 24 times.   So you have two DC between each of the trebles on the previous row.   Join with a slip stitch to the second of the chains that started the round.

Round 7.    Chain 2, (2DC into same stitch, Htr, 2 Tr into same stitch, DTr,  chain 5, miss three stitches and DTr into fourth stitch, 2Tr into same stitch, Htr, 2 DC into same stitch, DC, DC)  repeat twice, 2DC into same stitch, Htr, 2 Tr into same stitch, DTr,  chain 5, miss three stitches and DTr into fourth stitch, 2Tr into same stitch, Htr, 2 DC into same stitch, DC.  join with a slip stitch to the second of the chains that started the round.

Round 8.   Chain 2, DC into each stitch from the row below to the corner 5 chains.   Work into each corner 3 DC, 2 chain, 3 DC.  Repeat to end of round and join with a slip stitch to the second of the chains that started the round.

Round 9.     Chain 2, DC into each stitch from the row below.   At each corner work 2DC, chain 2, 2DC into the 2 chain space on the row below.    At end of round join with a slip stitch to the second of the chains that started the round.

NOTE – where you are changing colour on each round to create the ombre effect it works well if you move the start of each colour around rather than start and stop in the same place each time.

Wagon Wheel Block – US terms

Round 1.    Chain five and join to make a circle.

Round 2.    Chain 2, work 12 SC into the circle and join with a slip stitch to the second chain that started the round.

Round 3.     Chain 4,  (DC, chain 1) repeat 11 times so that you have thirteen spokes to the wheel – (the chain that started the round plus 12 more spokes).   Slip stitch into the third chain of the 4 chains that started the round.

Round 4.     chain 2, SC into the space between the trebles on the previous round.   (2 SC into the space between trebles) repeat 11 times.   So you have two SC between each of the trebles on the previous row.   Join with a slip stitch to the second of the chains that started the round.

Round 5.     Chain 4, (DC, chain 1) repeat 24 times so that you have 26 spokes to the wheel – (the chain that started the round plus 25 more spokes).   Slip stitch into the third chain of the 4 chains that started the round.

Round 6.     Chain 2, SC into the space between the trebles on the previous round.   (2 SC into the space between trebles) repeat 24 times.   So you have two SC between each of the trebles on the previous row.   Join with a slip stitch to the second of the chains that started the round.

Round 7.    Chain 2, (2SC into same stitch, HDC, 2 DC into same stitch, TRC,  chain 5, miss three stitches and TRC into fourth stitch, 2DC into same stitch, HDC, 2 SC into same stitch, SC, SC)  repeat twice, 2SC into same stitch, HDC, 2 DC into same stitch, TRC,  chain 5, miss three stitches and TRC into fourth stitch, 2DC into same stitch, HDC, 2 SC into same stitch, SC.  join with a slip stitch to the second of the chains that started the round.

Round 8.   Chain 2, SC into each stitch from the row below to the corner 5 chains.   Work into each corner 3 SC, 2 chain, 3 SC.  Repeat to end of round and join with a slip stitch to the second of the chains that started the round.

Round 9.     Chain 2, SC into each stitch from the row below.   At each corner work 2SC, chain 2, 2SC into the 2 chain space on the row below.    At end of round join with a slip stitch to the second of the chains that started the round

And there it is.   I hope you like it as much as I do.   Happy Crocheting!

Annie ๐Ÿ™‚

Filed Under: Craft projects, Crochet patterns Tagged With: blocks, commuter crochet, crochet, design, Free pattern, handmade, stash busting

pricing basics

June 30, 2018 by A_Sticky_tape_and_string_girl 2 Comments

Firstly if you are reading this CONGRATULATIONS on finishing your handmade project. Finishing projects is not my particular strength but I am super good at starting them ?

I love to browse the beautiful projects on Etsy and Ravelry and I believe that all the lovely creative people who make them deserve to be rewarded appropriately for the joy and beauty their work delivers. However, when I checked out the pricing of these amazing handmade products it appears to me that it is often grossly undervalued by the creator!

My current passion is crocheted blankets. Looking on Etsy I found that pricing in that category has a huge range. Some blankets are priced at ยฃ1,000 + and are commission only or designer one-offs made with expensive yarn. However, some are priced at a level that looks to barely cover the cost of the materials.

There are several different ways to value your work for sale and the best method for you really depends on your overall goal.


The basic approach. If you were producing goods for sale in a commercial world you would work out the full cost of your raw materials, add in the cost of your time and any overheads and apply a profit margin to get your price excluding shipping cost. From a review of handmade goods for sale on Etsy, I can see some examples of this type of pricing but in many cases the prices being charged look too low for this to have been the calculation used.

This means at first impression, either craft workers are selling their work at a loss or grossly undervaluing their time. It could be that they are selling individual projects at a loss but overall their business is making a healthy profit… interesting?

There are many possible reasons you are looking to sell your work but most of us are looking to make money one way or another!

If making money is your primary objective, is the income from selling your finished products where you will make that money?   This might sound like a strange question but…. bear with me….

Let’s assume you spend hours producing a beautiful crocheted blanket. The cost of yarn alone is likely to be at least ยฃ25 and could be far more than ยฃ100 for premium yarns. Add in the time to make the item… again this will be a huge range of values let’s assume 90 hours which would mean two hours a day for a month and a half. In the UK we have a national minimum wage which pays adults between six and eight GBP per hour so to simplify let’s go for the middle of the range and say ยฃ7 per hour. This means the labour cost of your project is 7 multiplied by 90 i.e. ยฃ630.

I am not sure whether you would expect to earn the minimum wage for your talented creative time but that is the minimum value that the outside world would place on your time in employment in the U.K.

Keeping things simple, you can see that the cost of producing the blanket is ยฃ630 for your time plus at least ยฃ25 for the materials giving COST ยฃ655. This means that you have to charge at least this much to avoid making a loss. The value you calculate for your time is the same as a wage or salary compensating you for your time. Anything you sell the item for on top of this cost is the profit you make.  I have put together a worksheet to help you with pricing your project.   Here is the free download.    I hope you find it helpful.   Pricing basics (25898 downloads ) .    This is what it looks like completed for a project.

I have not completed the commission cost as this is a function of the price on some selling sites.  You do need to consider this cost when working out how much you are earning.   I do not include shipping costs to your customers as these are normally on top of the sales price.

If craft projects are not your source of income and you ‘donate’ your time for the love of the craft then all you have to consider is your cost of yarn and any overheads. Anything above that would be ‘profit’.   However, do consider, your time is a limited resource.   You can only produce so many items.   You would need to view this as a way of funding your hobby rather than anything you can build a business on.

There are other ways to make money from your work.   In the example above, you have spent let’s say 180 hours to create a single product.   If you want to make a living, you have to cover the cost of those 180 hours with the sale of that one product. What if you had two products at the end of the project? You would spread the cost of that time over those two products!   The main source of your income is the primary product but you can make secondary products from the same effort.

    1. If your project was designed by you, the best secondary product from your work would be the pattern or instructions to produce the work. You need to write up the pattern or instructions. Ideally get those instructions tested by someone else. Save the pattern as a PDF type file and you then have something you can offer for sale as many times as you like.   This means those original 180 hours have produced a number of products that is only limited by the demand from your clients!    You could end up making more money from the pattern than from the finished item!  I will put out a more detailed post on this in future.
    2. You could photograph the work and put those images up for sale.
    3. You could put short video tutorials together showing your work in progress and explaining any tricky elements. Again these videos can be monetised.
    4. If you enjoy writing you could consider blogging about your craft. Using images of your work and explaining the techniques used. There are many free resources to show you how to start and monetise a blog. This link takes you to one of my first posts where I go into more detail on getting set up and the free tools I used. Starting a blog is easy follow the link below, pick a name for your blog and sign up for a low cost plan. Note this link is an affiliate link which means I could receive a small payment at no additional cost to you. This is how I keep my blog going.

Copyright © 2026 ยท Genesis Sample on Genesis Framework ยท WordPress ยท Log in