• Skip to primary navigation
  • Skip to main content
  • Skip to footer

Stickytapeandstring

Created with WordPress managed by 1&1

  • Craft projects
    • craft business tips
    • craft blog
    • Crochet patterns
    • Upcycling
    • craft with kids
  • Blogging
    • New to blogging
    • Blog diary
  • Bullet Journal
  • About me
  • Welcome!!

design

wedding favours

May 27, 2018 by A_Sticky_tape_and_string_girl Leave a Comment

Hello 🙂   The UK has just been through the most amazing wedding fever!    I don’t know anyone who is getting married soon but wanted to put a bit of time in on a wedding project so I came up with these little bags that could be used for wedding favours or if made a little larger could be given to flower girls to carry.

I have a huge stash of yarn oddments and managed to find some lovely baby pastel colours for this batch but the bags would also look good in bold colours to match any theme.

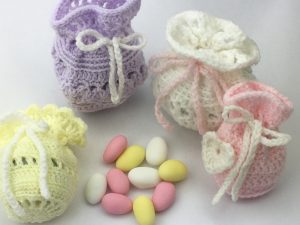
I will share the basic bag pattern here but as you can see I enjoyed playing around with the design to add in textures and features.    The yellow bag has a heart trim around the top.   The purple bag has a row of hearts around it.    The pattern I am sharing makes the little pink bag the one with the heart motif attached in the photo below.

The pattern is written in UK notation.   For US terms please note:

DC means SC in US notation

TR means DC in US notation

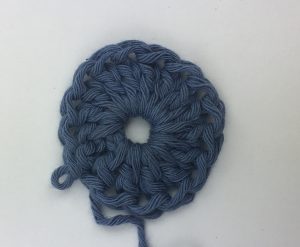
Bag Pattern – start by making a magic circle, chain 3 and work 17 Tr into the circle. Close with a slip stitch into the third chain from the start.

Pull the circle closed.

Work rounds as shown below, each time finish the round by joining to the chain with a slip stitch.

round 2 – chain 1 and work a round of DC, two into each of the stitches in the circle.

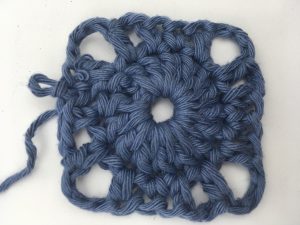
round 3 – chain 2 and work a round of TR

round 4 – chain 1 and work a round of DC into the back loop only of the row below.

round 5 – chain 1 and work a round of DC through both loops of the row below

round 6 – chain 2, work a round of TR into both loops of the row below

round 7 & 8 – chain 1 and work a round of DC through both loops of the row below

repeat rows 6 to 8 twice more.

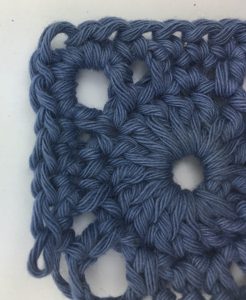
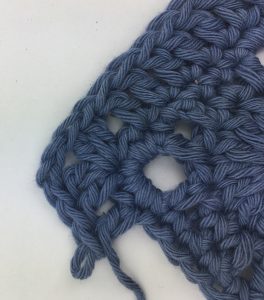
round 15 – chain 4, miss one stitch and work 1 TR into the next.  (Chain 1, miss one stitch and work 1 TR into the next) repeat to the end of the round and join to the third stitch of the first chain with a slip stitch.   This creates the round of ‘holes’ that we will use to thread the ribbon tie through.

round 16 & 17 – repeat round 7

round 18 – repeat round 6

round 19 – finish the work with a row of slip stitches around the top.

Ribbon ties – you could use ribbon to match any theme or make your own ‘ribbon’ using a row of chain.   I found that a chain of 70 was about the right length but you can judge this for yourself.

Hope you like these little bags.    I am going to be making more during the week and will put a few more patterns up for sale in my Etsy shop when I have written them up.

If you want to read about some of the challenges I have had when it comes to crochet in a house with puppies then please check my weekly blog.   Happy crocheting!

Annie 🙂

Filed Under: Craft projects, Crochet patterns Tagged With: bags, commuter crochet, Craft, crochet blog, design, favours, Free pattern, handmade, small bags, small crafts, stash buster, stash busting, weddings

Birthday bunting – free pattern

May 27, 2018 by A_Sticky_tape_and_string_girl Leave a Comment

I would like to share with you a free pattern for my birthday bunting.   We have a happy day coming up in our household.    Every year I buy trashy plastic decorations and would like to stop! I have seen lots of news articles about the impact of plastic on the environment. This made me wonder whether I could make some bunting that we could re-use and this is the result.    I am quite pleased with it 🙂

Firstly I made the basic flags.   Working in double knitting weight yarn. I used yarn from my stash. If you are buying new, I do recommend the Special DK by Stylecraft. This yarn is great value and comes in a wide range of colours. I will leave a search link below.   If you click on the link it will take you to the current offers Amazon have for this yarn. Please note any links in my posts may give me a small income at no additional cost to readers. You could make these even more sustainably by using recycled yarn. Yarn recycling is a fun hobby of mine and you can read about it, including methods and tips here.

Birthday bunting – free pattern starts here!

UK/(US) instructions – Basic flag pattern work as follows – using a 4mm hook and DK yarn

Chain 39 (note this is a chain of 37 with two for the turn)

Work one row in DC (US terms SC) starting with the third chain from the hook

Turn, chain two. Work one row in DC (US terms SC) starting in the top of the second DC on the row below.

Turn, chain three. Work one row in TR (US terms DC) starting in the top of the second DC on the row below.

Repeat – so that you are doing two rows of DC (US terms SC), followed by a row of TR (US terms DC). At the start of each row, reduce one stitch by missing the first stitch of the row and working into the second.

As you repeat this pattern you will find each time you work a row of TR (US terms SC) you will have 3 stitches fewer than you had on the last row of that type.   Eventually you will get to a row of trebles where you only have 2 stitches to work and at that point you can finish off the work.

Making up the Bunting

To make the top of the bunting I started with a chain of six and formed a loop.   I then worked 30 chain before working 37 DC (US terms SC) across the top of the first flag using DC (US terms SC).   Put in 10 chain between each flag taking care not to allow the chain to twist.   Carry on until you have included all the flags you need. At the end work 30 chain then six more chain. Slip stitch into the first of these last six to make a loop.

Finally, work 12 DC (US terms SC) into the loop formed by the six chain and then work DC (US terms SC) all along the bunting to the end where you need to work 12 DC (US terms SC) into the final loop and slip stitch to finish off.

If you wanted to make smaller bunting then simply start with a smaller number of stitches.

Decoration is optional depending on the occasion.   As this is for a birthday I wanted to include the lettering.    Initially I worked up the letters in free form crochet but I wasn’t very happy with the result so I used felt instead.   This also made it a bit quicker to make.   I edged the felt letters with blanket stitch in the same colour way as a contrast.    Here is a close up of the ‘Happy’ 🙂

And on that note I will bring the post to a close – please let me know how you like the bunting.   I will be putting it up on my Etsy page which you can see here. Happy crocheting!

April 2020 update – I am reusing this pattern to make rainbow bunting to show support for the medical profession and all carers as the world fights Covid-19. Pattern to follow.

Annie 🙂

Filed Under: Craft projects, Crochet patterns Tagged With: Birthday, bunting, commuter crochet, Craft, crochet, design, Free pattern, handmade, small crafts, stash busting

Stripes Scarf – Blue

May 6, 2018 by A_Sticky_tape_and_string_girl 2 Comments

Here is a blue version of my Stash Buster Scarf.   I wrote up the pattern that I created when I made the pink/purple version and realised that I didn’t have yarn quantities so I made it up again in blue so I could get the weight of yarn required.    I also took photos during the making process so that I could add them to the pattern.

The pattern uses five colours and I happened to have four blue shades in my stash so went with those plus white to make five colours for this design.

I wanted to be able to explain in pictures the way that I finished the scarf off without needing to weave in ends.   I also wanted to show how I added in additional yarn to bulk out the fringing.    The finished pattern is up on my Etsy store which you can reach on the following link.

Stash Buster Scarf Pattern

This pattern is very easy so would suit a beginner and can be made up in whatever colours you choose.   Sounds dreadful to be thinking about Christmas as we are in May currently but I think this would make a lovely handmade gift and you can pick a colourway to suit the person it is for.

I have listed the pattern on Etsy but you can grab it here for free on this download. Stripes scarf (18494 downloads )
Happy Crocheting!

Annie 🙂


Filed Under: Craft projects, Crochet patterns Tagged With: Craft, crochet, design, Etsy, handmade, scarf, scarves, stash busting, yarn

Spring blanket

May 1, 2018 by A_Sticky_tape_and_string_girl Leave a Comment

The sun has come out in the UK.  It is April and we have had a lovely few days of really warm weather.  I have been working on a blanket in spring colours and was looking for opportunities to work on this on my commute so I have incorporated some pretty flowers and blocks into the design that can be worked up separately and added to the larger work at home 🙂

Here are the colours I am using and you can see I have made a start with the first few rows in basic stitches.   I am trying Stylecraft DK for the first time as I have seen so many crochet bloggers recommending it.   It is certainly good value and has been very nice to work with so far.   There is a fantastic range of colours to inspire and I am already thinking about the next project and the next…. although that does not help me reduce my yarn stash!! (shhhh!!).

The flowers in the picture below will form a row across the blanket and I plan rows of pale pink and white to follow.   These flowers are perfect for working on my commute!!   I have been working up the centres one day and then adding petals the next so that I only ever have to carry one ball of yarn.

The main blanket is already quite large as I am aiming at double bed size.   It can only really be worked on at home now but it is growing quickly.  I love these colours they are making me really happy as I work 🙂

I am documenting the pattern as I go as I plan to list the blanket and pattern in my Etsy shop.  I will post an update when I get to the next stage and I am working up blocks on the commute.   One day I will get organised and issue these patterns as a CAL but I think I need a few more blog readers before I try that.   I wish I could spend more time on my crafting and blogging but I don’t suppose I am alone in that.  Too many ideas and too little time.   Ah well….

Happy crocheting!

Annie 🙂


Filed Under: craft blog, Craft projects Tagged With: blankets, commuter crochet, commuting, Craft, crochet, design, handmade, small crafts

Sample Square – pattern

April 22, 2018 by A_Sticky_tape_and_string_girl Leave a Comment

Hello – just a short post to give you the pattern for the sample squares I worked on last week.    This is what they look like – with an edge and without.

The instructions are written using UK notation.   For US conversion please use the terms in brackets.  CH = chain, DC = double crochet (US – single crochet) , Tr = treble (US – double crochet), Htr = half treble (US – half double crochet).

Round 1 – CH 5 and form into a ring with a slip stitch into the first loop of the chain

Round 2 – chain three then work 15 Tr into the centre ring.   Finish the circle by slip stitch into the third of the chain stitches you started the round with.    Check – this should give you a wheel with 16 spokes!

Round 3 – CH 2, DC, (CH1, Htr, CH2, Htr, CH1, 2DC) x 3, CH1, Htr, CH2, Htr, CH1, DC.    Finish the round with a slip stitch into the second of the chain stitches you started the round with.

Note you should have the beginnings of a square now.   The spaces created by each of the 2chain elements is the start of the corners.


Round 4 – a round of DC with four along each side and 5 into the corner space.   CH2, work 2 DC which should bring you to the corner space.   (Work 5 DC into the corner space.  Work 4 DC along the next side.) x 3, work 5 DC into the final corner space, work 1 DC and join with a slip stitch to the second of the chain stitches you started the round with.

Round 5 – a round of trebles with six along each side and four with a two chain spacer at each corner.   CH3, 3Tr into the top of the dc’s on the row below.  Miss one of the dcs then (into the top of the middle dc of the corner work (2 Tr, CH2, 2Tr) all into the same stitch, miss one dc on the row below then work 6Tr along the next side) x 3, into the top of the middle dc of the final corner work (2Tr, CH2, 2Tr) all into the same stitch, miss one dc on the row below then work 2Tr and finish with a slip stitch into the third of the chain stitches you started the round with.

Edging – I edged my squares in black by working a round of dc’s into every stitch on the final round – 10 down each side and five into the corner space.

And there it is!   I hope you find it easy to understand, I have taken a lot of photos which should help.

Any questions please leave me a comment and I will try to help.

Happy crocheting!

Annie 🙂

Filed Under: Craft projects, Crochet patterns Tagged With: blocks, commuter crochet, crochet, design, Free pattern, handmade, original, pattern, squares, stash buster

Sample Squares

April 15, 2018 by A_Sticky_tape_and_string_girl 2 Comments

Last Christmas I asked my husband for what he thought was a very strange present.  I asked him to get me one ball of each colour of a certain type of yarn.     I wanted to be able to play with the colours and to put together a blanket design based on all the colours available.    The yarn I had picked was Drops Paris.   I chose this because I wanted to work in heavy cotton and this yarn is so inexpensive it made the project affordable.     Apparently ordering the yarn one ball at a time was quite a lengthy process so my husband called the online retailer and some very helpful people processed his order by phone!

I designed a pattern for a small square and produced one of every colour except black.    I decided to use black to edge all the squares so didn’t want a black square.   Here is a picture of my finished set of one of every colour sample squares 🙂

I designed the blanket by laying these all out on the kitchen table and moving them around until I saw the design I wanted.   I then worked out how many more squares of each colour I needed and calculated my yarn requirement based on that.   I have placed a yarn order and I am now waiting for delivery.    Whilst waiting for the yarn to arrive, I used the single ball of black yarn that I did have to edge a few of the squares.   I am never sure whether I want to edge in black or white but I do think black is more practical.

When the yarn arrives I will be able to make up the rest of the blanket and will be sharing photos here.   I will put the pattern and the finished product up on my Etsy shop.   I have found this method of designing very quick and easy once I had made all the small squares.   It did take quite a long time to make up the sample squares though and I have ended up with a few that I will not be using.   I wouldn’t want to do this with a more expensive yarn.

This is the final theme for my project.   I have arranged the squares in a rainbow with a pastel, muted and bright row of each colour.   This is only possible because of the large range of colours in this particular yarn.   I hope you like the idea 🙂

If anyone would like the pattern for the coloured square it is available in the patterns section of my blog.     The blanket would be  a great stash busting project if you have a lot of oddments of yarn of similar weight.    I would recommend  using one colour for the edging of each square to pull the blanket into one design.

That’s all from me for now.  On to the next design…..

Happy crocheting!

Annie 🙂

Filed Under: craft blog, Craft projects Tagged With: blankets, cotton, Craft, crochet, design, Etsy, handmade, stash busting, yarn

  • « Go to Previous Page
  • Page 1
  • Page 2
  • Page 3
  • Page 4
  • Page 5
  • Go to Next Page »

Footer

Newsletter

Copyright © 2026 · Genesis Sample on Genesis Framework · WordPress · Log in